

Written by me@grafxflow
14 May, 2018
0
6,623
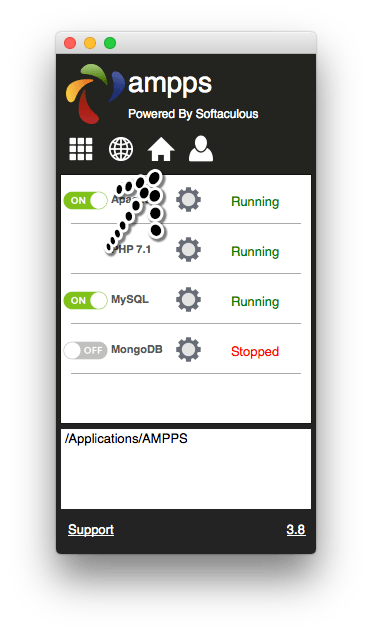
Now for this tutorial I have decided to use ampps instead of mamp due to my recent liking of using ampps. It already has an option to install laravel from its built in menu but I have decided to use the terminal for parts of the tutorial.
So to start of with for this tutorial I will be using the following applications.
Note: You will need php 7.1.3 minimum and if you want to know how to create the composer shorthand in the terminal you can view this tutorial composer install
Open the terminal and choose the ampps directory.
cd /Applications/AMPPS/www
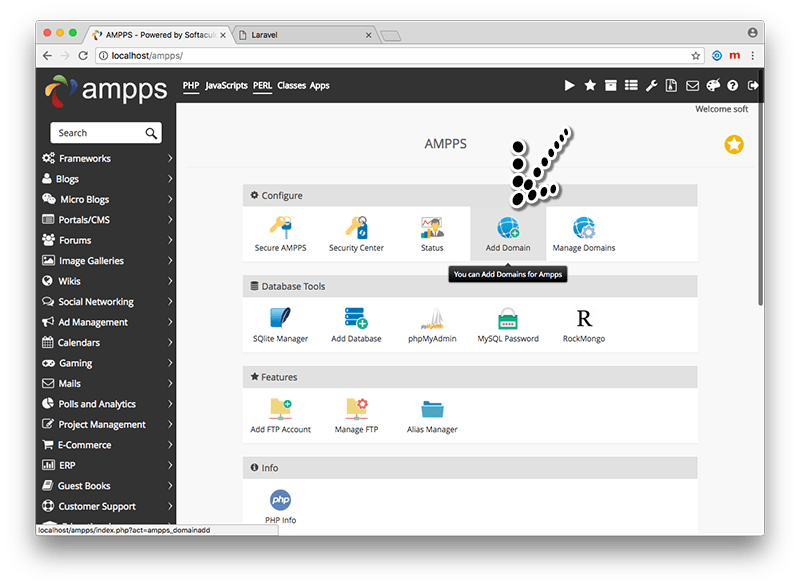
composer create-project laravel/laravel laravel-passport-apiSo now we will setup the domain in ammps this is where it will differ to mamp and show you some of the nice elements of using ampps. Open up the ammps application and launch the ammps browser dashboard with the home icon.
Now choose the 'Add Domain option'.
Lets input the following.
laravel-passport-api

/Applications/AMPPS/www/laravel-passport-api/public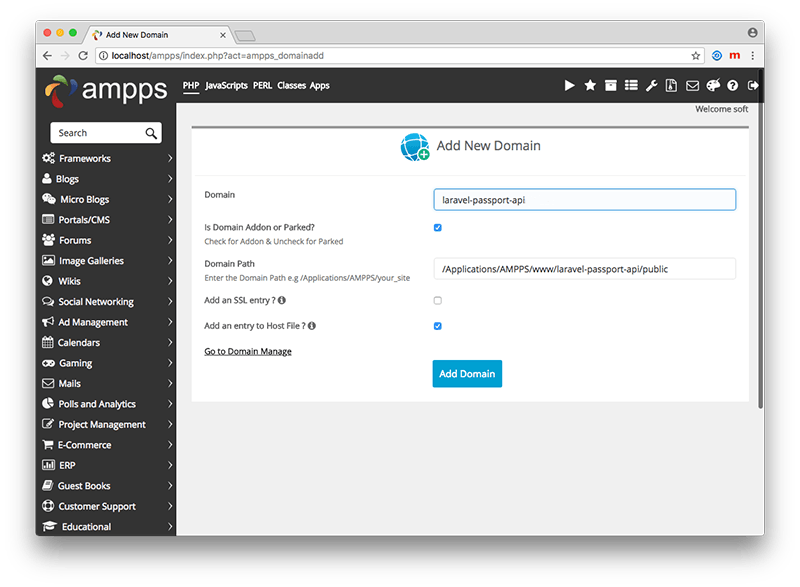
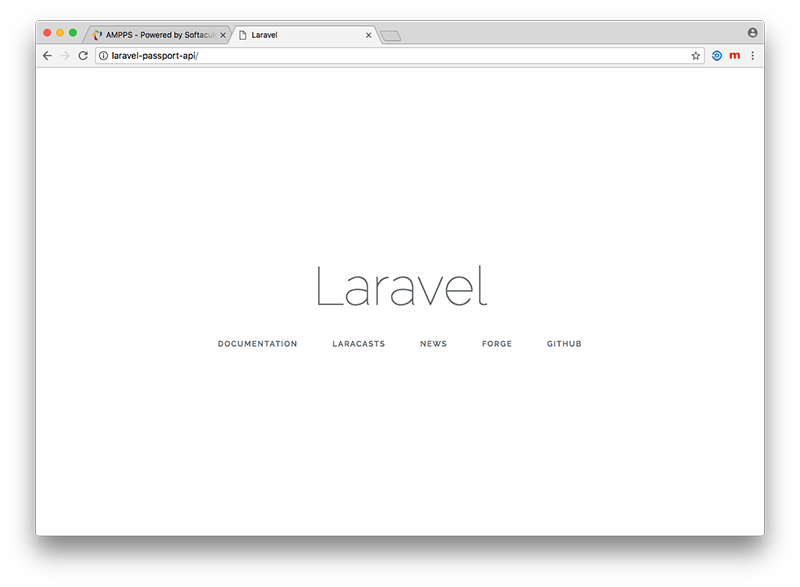
Now open a new tab in your browser http://laravel-passport-api and you will see the default laravel landing page.
Now you can choose another app such as sequal pro to setup the database but for this tutorial I will go back to the ampps browser tab, and choose the 'Add database' option.
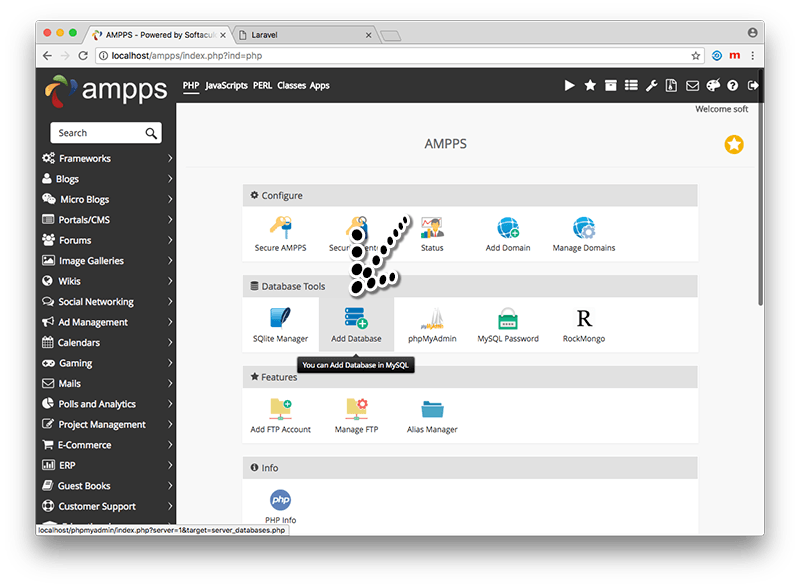
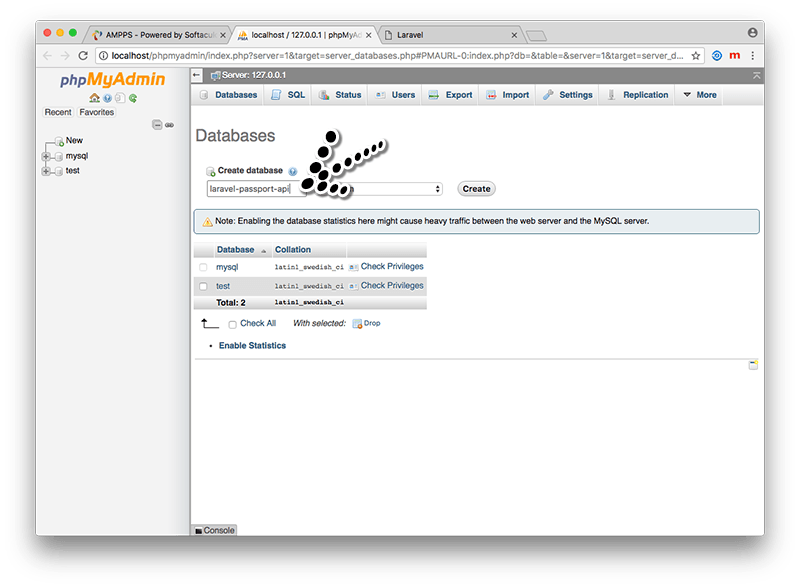
This will open a new tab with phpMyAdmin so now add a database called 'laravel-passport-api' then close down the browser tab.
Back in the terminal we will update laravel with the new database details.
Note: You can change the application to whatever you prefer such as 'Adobe Dreamweaver CC 2018', 'Atom' when using open in the terminal.
open -a "Adobe Dreamweaver CC 2018" /Applications/AMPPS/www/laravel-passport-api/.env And add the details, which by default in are 'root' and 'mysql'.
DB_CONNECTION=mysql
DB_HOST=127.0.0.1
DB_PORT=3306
DB_DATABASE=laravel-passport-api
DB_USERNAME=root
DB_PASSWORD=mysqlNow you will probably get an error message saying SQLSTATE[42000]: Syntax error or access violation: 1071 Specified key was too long; so make the following changes to be safe - from my research it seems to relate to the MySQL being 5.6 instead of 5.7 which AMPPS doesn't support.
So open the following file.
open -a "Adobe Dreamweaver CC 2018" /Applications/AMPPS/www/laravel-passport-api/app/Providers/AppServiceProvider.phpThen edit the file and adding the following and try the migration above again.
<?php

namespace App\Providers;

use Illuminate\Support\ServiceProvider;
// This is the important bit
use Illuminate\Support\Facades\Schema;

class AppServiceProvider extends ServiceProvider
{
    /**
     * Bootstrap any application services.
     *
     * @return void
     */
    public function boot()
    {
        // This is the important bit
        Schema::defaultStringLength(191);
    }

    /**
     * Register any application services.
     *
     * @return void
     */
    public function register()
    {
        //
    }
}
Now go back to the terminal and install the passport package.
cd /Applications/AMPPS/www/laravel-passport-api

composer require laravel/passport
Then setup the passport configuration by entering the following (reason for MySQL fix above).
php artisan migrateNow we need to setup the token security keys for use with passport and the api calls.
php artisan passport:installIt will output the secret codes for client ID1 and Client ID2 and it will also have added these to the database on the 'oauth_clients' column.
There are 3 files to setup the passport configuration. So open the first.
open -a "Adobe Dreamweaver CC 2018" /Applications/AMPPS/www/laravel-passport-api/app/User.phpAnd change the following adding the HasApiTokens.
<?php

namespace App;

use Illuminate\Notifications\Notifiable;
use Laravel\Passport\HasApiTokens;
use Illuminate\Foundation\Auth\User as Authenticatable;

class User extends Authenticatable
{
    use HasApiTokens, Notifiable;

    /**
     * The attributes that are mass assignable.
     *
     * @var array
     */
    protected $fillable = [
        'name', 'email', 'password',
    ];

    /**
     * The attributes that should be hidden for arrays.
     *
     * @var array
     */
    protected $hidden = [
        'password', 'remember_token',
    ];
}
Now open the second file.
open -a "Adobe Dreamweaver CC 2018" /Applications/AMPPS/www/laravel-passport-api/app/Providers/AuthServiceProvider.phpEdit the file with the following.
<?php

namespace App\Providers;

use Laravel\Passport\Passport;
use Illuminate\Support\Facades\Gate;
use Illuminate\Foundation\Support\Providers\AuthServiceProvider as ServiceProvider;

class AuthServiceProvider extends ServiceProvider
{
    /**
     * The policy mappings for the application.
     *
     * @var array
     */
    protected $policies = [
        'App\Model' => 'App\Policies\ModelPolicy',
    ];

    /**
     * Register any authentication / authorization services.
     *
     * @return void
     */
    public function boot()
    {
        $this->registerPolicies();

        Passport::routes();

        //
    }
}
Now lets edit the third file.
open -a "Adobe Dreamweaver CC 2018" /Applications/AMPPS/www/laravel-passport-api/config/auth.phpAnd make the main change to the 'guards' -> 'api', 'providers' -> 'users' -> 'driver' -> 'eloquent' and 'providers' -> 'users' -> 'model' -> App\User::class.
<?php

return [

    /*
    |--------------------------------------------------------------------------
    | Authentication Defaults
    |--------------------------------------------------------------------------
    |
    | This option controls the default authentication "guard" and password
    | reset options for your application. You may change these defaults
    | as required, but they're a perfect start for most applications.
    |
    */

    'defaults' => [
        'guard' => 'web',
        'passwords' => 'users',
    ],

    /*
    |--------------------------------------------------------------------------
    | Authentication Guards
    |--------------------------------------------------------------------------
    |
    | Next, you may define every authentication guard for your application.
    | Of course, a great default configuration has been defined for you
    | here which uses session storage and the Eloquent user provider.
    |
    | All authentication drivers have a user provider. This defines how the
    | users are actually retrieved out of your database or other storage
    | mechanisms used by this application to persist your user's data.
    |
    | Supported: "session", "token"
    |
    */

    'guards' => [
        'web' => [
            'driver' => 'session',
            'provider' => 'users',
        ],

        'api' => [
            'driver' => 'passport',
            'provider' => 'users',
        ],
    ],

    /*
    |--------------------------------------------------------------------------
    | User Providers
    |--------------------------------------------------------------------------
    |
    | All authentication drivers have a user provider. This defines how the
    | users are actually retrieved out of your database or other storage
    | mechanisms used by this application to persist your user's data.
    |
    | If you have multiple user tables or models you may configure multiple
    | sources which represent each model / table. These sources may then
    | be assigned to any extra authentication guards you have defined.
    |
    | Supported: "database", "eloquent"
    |
    */

    'providers' => [
        'users' => [
            'driver' => 'eloquent',
            'model' => App\User::class,
        ],

        // 'users' => [
        //     'driver' => 'database',
        //     'table' => 'users',
        // ],
    ],

    /*
    |--------------------------------------------------------------------------
    | Resetting Passwords
    |--------------------------------------------------------------------------
    |
    | You may specify multiple password reset configurations if you have more
    | than one user table or model in the application and you want to have
    | separate password reset settings based on the specific user types.
    |
    | The expire time is the number of minutes that the reset token should be
    | considered valid. This security feature keeps tokens short-lived so
    | they have less time to be guessed. You may change this as needed.
    |
    */

    'passwords' => [
        'users' => [
            'provider' => 'users',
            'table' => 'password_resets',
            'expire' => 60,
        ],
    ],

];
Now for this we need to create some example data to test its all working, so for this example I will create some blog posts we can migrate.
php artisan make:migration create_posts_tableThis will create a file inside the 'database/migrations/YYYY_MM_DD_HHMMSS_create_posts_table.php'. So lets edit the file.
open -a "Adobe Dreamweaver CC 2018" /Applications/AMPPS/www/laravel-passport-api/database/migrations/2018_05_13_192230_create_posts_table.php
2018_05_13_192230_create_posts_table.php
Add the following - mainly for 'title', 'content'.
<?php

use Illuminate\Support\Facades\Schema;
use Illuminate\Database\Schema\Blueprint;
use Illuminate\Database\Migrations\Migration;

class CreatePostsTable extends Migration
{
    /**
     * Run the migrations.
     *
     * @return void
     */
    public function up()
    {
        Schema::create('posts', function (Blueprint $table) {
            $table->increments('id');
            $table->string('title');
            $table->text('content');
            $table->timestamps();
        });
    }

    /**
     * Reverse the migrations.
     *
     * @return void
     */
    public function down()
    {
        Schema::dropIfExists('posts');
    }
}
Again lets migrate this.
php artisan migrateHere we will now create a model for the posts.
php artisan make:model Post

open -a "Adobe Dreamweaver CC 2018" /Applications/AMPPS/www/laravel-passport-api/app/Post.php
And make the following changes which for this I am making 'title' and 'content' editable.
<?php

namespace App;

use Illuminate\Database\Eloquent\Model;

class Post extends Model
{
    /**
     * The attributes that are mass assignable.
     *
     * @var array
     */
    protected $fillable = [
        'title', 'content'
    ];
}For this section we will create the api routes that our app will use for calling the rest json data. Open the api routes file.
open -a "Adobe Dreamweaver CC 2018" /Applications/AMPPS/www/laravel-passport-api/routes/api.php<?php
use Illuminate\Http\Request;
/*
|--------------------------------------------------------------------------
| API Routes
|--------------------------------------------------------------------------
|
| Here is where you can register API routes for your application. These
| routes are loaded by the RouteServiceProvider within a group which
| is assigned the "api" middleware group. Enjoy building your API!
|
*/
/* User must login to access the json data */
Route::post('apiregister', 'ApiRegisterController@register');
Route::middleware('auth:api')->group( function () {
Route::resource('posts', 'PostController');
});
Also from my tests another file needs to be amended or else none of the api calls work so I am unsure it relates to using '' in the web routes later. But anyway open the following file and add your domain to the 'protected function mapApiRoutes()'.
open -a "Adobe Dreamweaver CC 2018" /Applications/AMPPS/www/laravel-passport-api/app/Providers/RouteServiceProvider.phpAnd add the api domain.
<?php

namespace App\Providers;

use Illuminate\Support\Facades\Route;
use Illuminate\Foundation\Support\Providers\RouteServiceProvider as ServiceProvider;

class RouteServiceProvider extends ServiceProvider
{
    /**
     * This namespace is applied to your controller routes.
     *
     * In addition, it is set as the URL generator's root namespace.
     *
     * @var string
     */
    protected $namespace = 'App\Http\Controllers';

    /**
     * Define your route model bindings, pattern filters, etc.
     *
     * @return void
     */
    public function boot()
    {
        //

        parent::boot();
    }

    /**
     * Define the routes for the application.
     *
     * @return void
     */
    public function map()
    {
        $this->mapApiRoutes();

        $this->mapWebRoutes();

        //
    }

    /**
     * Define the "web" routes for the application.
     *
     * These routes all receive session state, CSRF protection, etc.
     *
     * @return void
     */
    protected function mapWebRoutes()
    {
        Route::middleware('web')
             ->namespace($this->namespace)
             ->group(base_path('routes/web.php'));
    }

    /**
     * Define the "api" routes for the application.
     *
     * These routes are typically stateless.
     *
     * @return void
     */
    protected function mapApiRoutes()
    {
        Route::prefix('http://laravel-passport-api')
             ->middleware('api')
             ->namespace($this->namespace)
             ->group(base_path('routes/api.php'));
    }
}For this section we will be creating the controllers required mainly for the api register, posts and access.
So first create the master controller which will control all the request and errors.
php artisan make:controller MasterController

open -a "Adobe Dreamweaver CC 2018" /Applications/AMPPS/www/laravel-passport-api/app/Http/Controllers/MasterController.php
Add the following.
<?php

namespace App\Http\Controllers;

use Illuminate\Http\Request;

class MasterController extends Controller
{
    /**
     * success response method.
     *
     * @return \Illuminate\Http\Response
     */
    public function returnResponse($result, $message)
    {
        $response = [
            'success' => true,
            'data'    => $result,
            'message' => $message,
        ];

        return response()->json($response, 200);
    }

    /**
     * return error response.
     *
     * @return \Illuminate\Http\Response
     */
    public function returnError($error, $errorMessages = [], $code = 404)
    {
        $response = [
            'success' => false,
            'message' => $error,
        ];

        if(!empty($errorMessages)){
            $response['data'] = $errorMessages;
        }

        return response()->json($response, $code);
    }
}
Now create the posts controller which will extend the MasterController.
php artisan make:controller PostController

open -a "Adobe Dreamweaver CC 2018" /Applications/AMPPS/www/laravel-passport-api/app/Http/Controllers/PostController.php
Edit the file with the following.
<?php

namespace App\Http\Controllers;

use Illuminate\Http\Request;
use App\Http\Controllers\MasterController as MasterController;
use App\Post;
use Validator;

class PostController extends MasterController
{
    /**
     * Display a listing of the resource.
     *
     * @return \Illuminate\Http\Response
     */
    public function index()
    {
        $posts = Post::all();

        return $this->returnResponse($posts->toArray(), 'Posts returned successfully.');
    }

    /**
     * Store a newly created resource in storage.
     *
     * @param  \Illuminate\Http\Request  $request
     * @return \Illuminate\Http\Response
     */
    public function store(Request $request)
    {
        $input = $request->all();

        $validator = Validator::make($input, [
            'title' => 'required',
            'content' => 'required'
        ]);

        if($validator->fails()){
            return $this->returnError('Validation Error.', $validator->errors());
        }

        $post = Post::create($input);

        return $this->returnResponse($post->toArray(), 'Post created successfully.');
    }

    /**
     * Display the specified resource.
     *
     * @param  int  $id
     * @return \Illuminate\Http\Response
     */
    public function show($id)
    {
        $post = Post::find($id);

        if (is_null($post)) {
            return $this->returnError('Post not found.');
        }

        return $this->returnResponse($post->toArray(), 'Post returned successfully.');
    }

    /**
     * Update the specified resource in storage.
     *
     * @param  \Illuminate\Http\Request  $request
     * @param  int  $id
     * @return \Illuminate\Http\Response
     */
    public function update(Request $request, Post $post)
    {
        $input = $request->all();

        $validator = Validator::make($input, [
            'title' => 'required',
            'content' => 'required'
        ]);

        if($validator->fails()){
            return $this->returnError('Validation Error.', $validator->errors());
        }

        $post->title = $input['title'];
        $post->content = $input['content'];
        $post->save();

        return $this->returnResponse($post->toArray(), 'Post updated successfully.');
    }

    /**
     * Remove the specified resource from storage.
     *
     * @param  int  $id
     * @return \Illuminate\Http\Response
     */
    public function destroy(Post $post)
    {
        $post->delete();

        return $this->returnResponse($post->toArray(), 'Post deleted successfully.');
    }
}
Now create the api register controller which will allow access to the json api calls.
php artisan make:controller ApiregisterController

open -a "Adobe Dreamweaver CC 2018" /Applications/AMPPS/www/laravel-passport-api/app/Http/Controllers/ApiregisterController.php
And add the following.
<?php

namespace App\Http\Controllers;

use Illuminate\Http\Request;
use App\User;
use Illuminate\Support\Facades\Auth;
use Validator;
use App\Http\Controllers\MasterController as MasterController;

class ApiregisterController extends MasterController
{
    /**
     * Register api
     *
     * @return \Illuminate\Http\Response
     */
    public function register(Request $request)
    {
        $validator = Validator::make($request->all(), [
            'name' => 'required',
            'email' => 'required|email',
            'password' => 'required',
            'c_password' => 'required|same:password',
        ]);

        if($validator->fails()){
            return $this->returnError('Validation Error.', $validator->errors());
        }

        $input = $request->all();
        $input['password'] = bcrypt($input['password']);
        $user = User::create($input);
        $success['token'] =  $user->createToken('ApiApp')->accessToken;
        $success['name'] =  $user->name;

        return $this->returnResponse($success, 'User access register successful.');
    }
}Now this next part is optional but I have included it if you plan on making laravel just for making api calls and not the front end framework. So rather than the default error html pages it will output json.
So open the web routes file.
open -a "Adobe Dreamweaver CC 2018" /Applications/AMPPS/www/laravel-passport-api/routes/web.phpEdit the file with.
<?php

/*
|--------------------------------------------------------------------------
| Web Routes
|--------------------------------------------------------------------------
|
| Here is where you can register web routes for your application. These
| routes are loaded by the RouteServiceProvider within a group which
| contains the "web" middleware group. Now create something great!
|
*/

Route::fallback(function(){
    return ["errors" => ["reason" => "forbidden",
                         "message" =>  "Forbidden"],
           "code" => 404,
           "message" => "Forbidden"];
});
Now this overpowers all the output as json.
open -a "Adobe Dreamweaver CC 2018" /Applications/MAMP/htdocs/git-version-htdocs/timestamp.one.new/api/timestamp.one-app-yoda/app/Providers/RouteServiceProvider.phpFor making all the api calls I am using the Postman application. So startup the software and in the first tab choose 'POST' and 'http://laravel-passport-api/api/apiregister'. With this we are registering the user details for the first time.
Choose the 'Header' tab and input the following.
Accept: application/json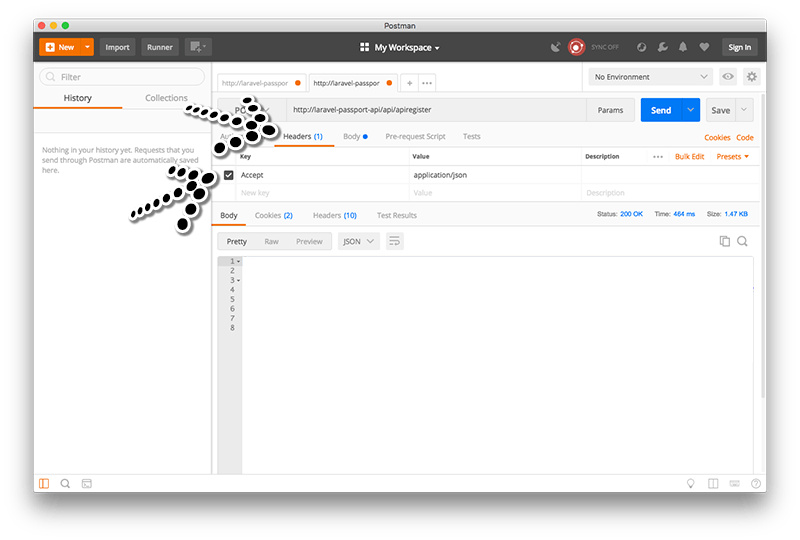
Then choose the 'Body' tab and input the following.
name:       username_example
email:      email@address.com
password:   password_example
c_password: password_example
On pressing 'Send' it should contain the json with 'success' -> 'true'.
There maybe times when pressing the login could cause errors and it maybe due to too many login attempt via laravels throttle. Just input the following.
php artisan cache:clear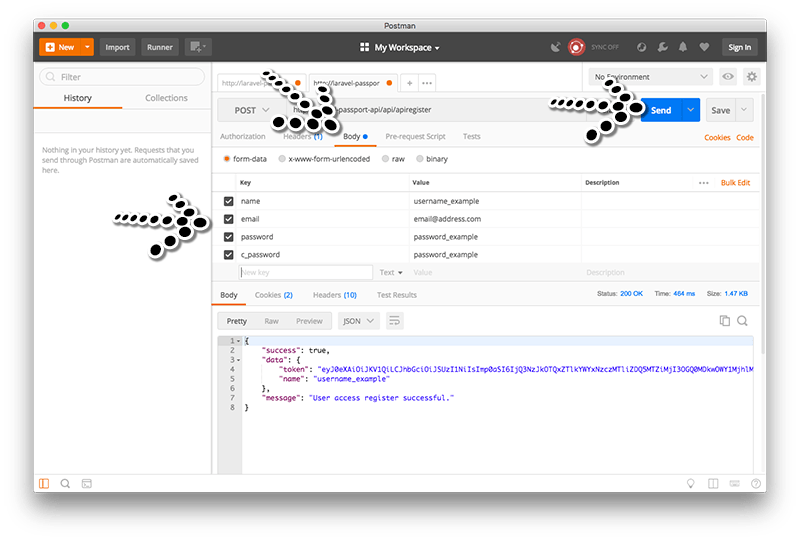
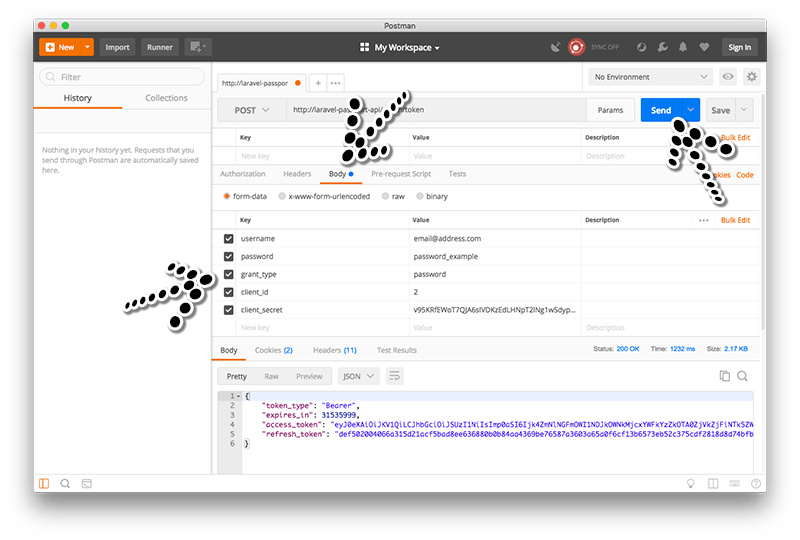
Now we want to emulate the user login for setting the token/session. So create a new tab and choose 'POST' and 'http://laravel-passport-api/oauth/token'. In the 'Body' tab enter each of these separately.
Note: To find the 'client_secret' find the database and choose 'oauth_clients' table and find the 'id', 'secret' column next to the name that equals 'Laravel Password Grant Client'.
username:       email@address.com
password:       password_example
grant_type:     password
client_id:      [id column from oauth_clients table | database]
client_secret:  [secret column from oauth_clients table | database]
Now press 'Send' and it should output 'token_type', 'expires_in', 'access_token' and 'refesh_token'.
First lets add a few posts via the terminal using 'artisan tinker'.
php artisan tinker

$post = new App\Post;
$post->title = 'laravel tutorial 1';
$post->content = 'Here is a short tutorial';
$post->save();

$post = new App\Post;
$post->title = 'laravel tutorial 2';
$post->content = 'Here is a short tutorial';
$post->save();

$post = new App\Post;
$post->title = 'laravel tutorial 3';
$post->content = 'Here is a short tutorial';
$post->save();
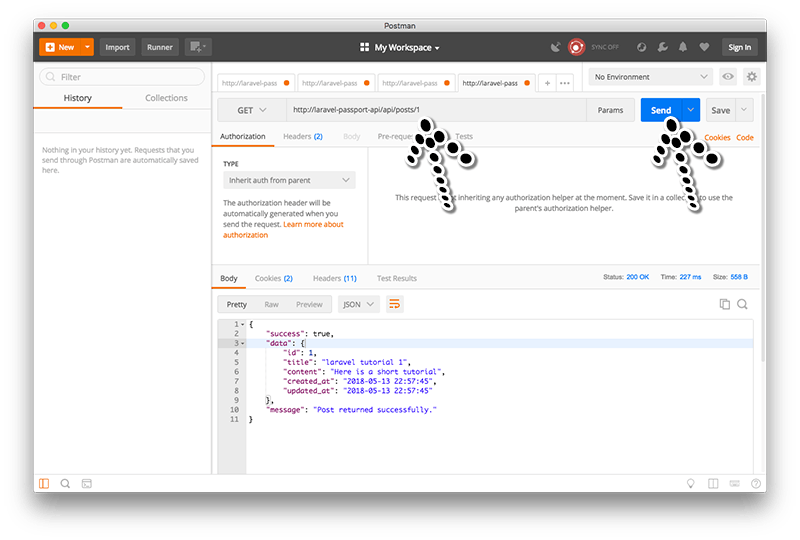
exit();So lets list all the products with an api call. So back in Postman application open a new tab and choose the method as 'GET' and 'http://laravel-passport-api/api/posts'. In the 'Headers' tab enter each of these separately, the Authorization will start something like this 'Bearer eyJ0eXAiOi...' - there is a space between.
Accept:         Accept
Authorization: Bearer [access_token from the token generated in the http://laravel-passport-api/oauth/token tab]Now to make life easier hover over the tab pressing the 'crtl' key and choose the 'duplicate' from the popup menu. This saves us having to add the token access_token details over and over again in the header tab. Now from the duped tab change the method to 'POST' and 'http://laravel-passport-api/api/posts'. Then in the body tab enter the following. The new project should be returned in the json api call.
title:          Laravel 4
content:        Short content for Laravel 4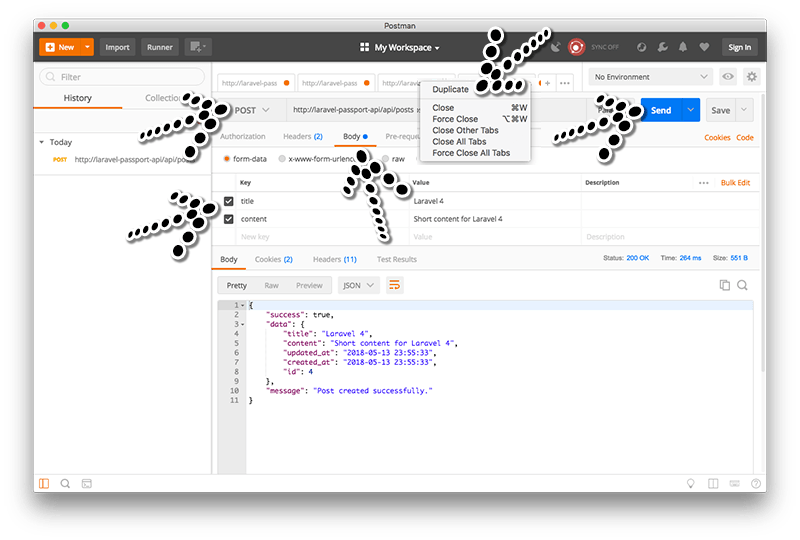
Now we want to show an individual post so duplicate the tab again but from this new tab delete all the attributes on the 'Body' tag. Also change the method to 'GET' and add one of the posts id to the url so for this example 1 'http://laravel-passport-api/api/posts/1'. This again should output the following.
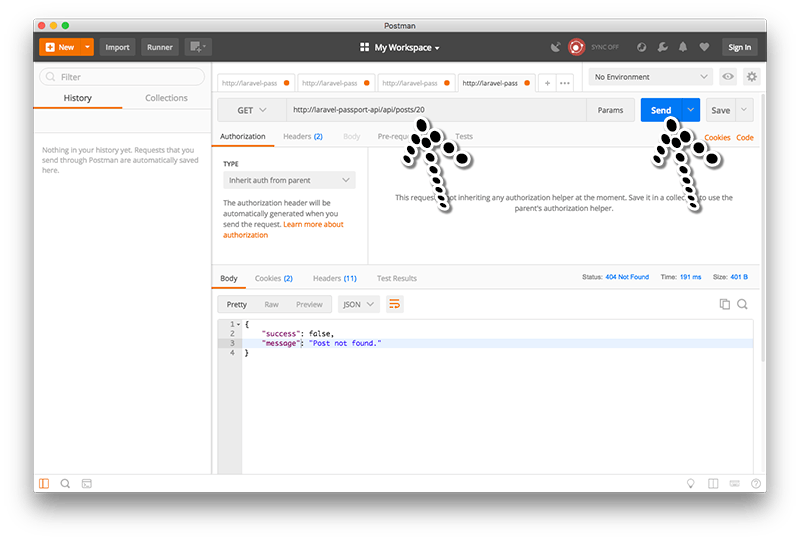
Next change it to a number that doesn't exist like 20 - 'http://laravel-passport-api/api/posts/20'. This should now return 'Post not found'.
Now we want to update an individual post so duplicate the tab again but from this new tab and add some 'Params'. Also change the method to 'PUT' and add one of the posts id to the url so for this example 1 'http://laravel-passport-api/api/posts/1'. This will now output the changes.
title:          Laravel 1 amended
content:        Amended short content for Laravel 1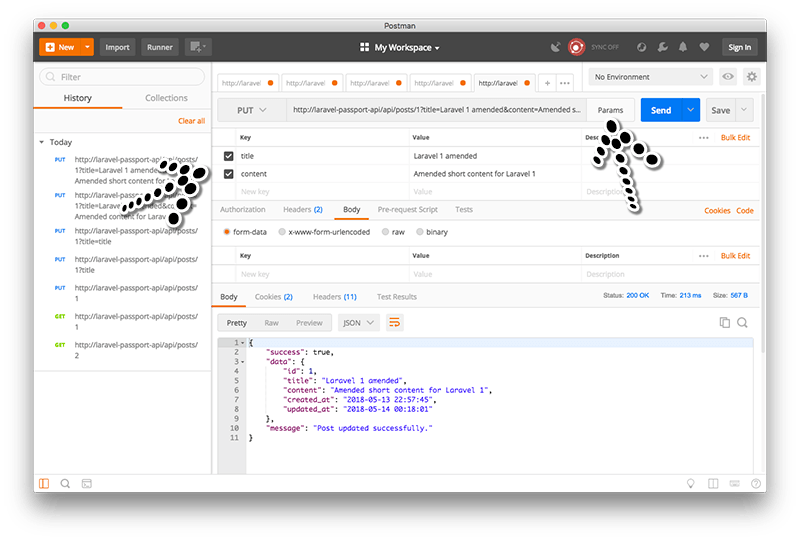
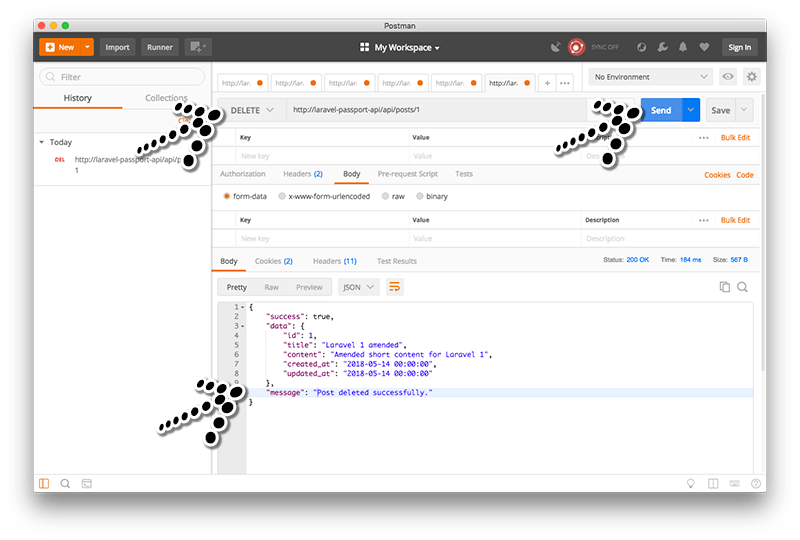
Now the final option is to delete a post. Lets duplicate the tab again and change the method to 'DELETE' and add one of the posts id to the url so for this example 1 'http://laravel-passport-api/api/posts/1' - inputting this will automatically wipe the 'Params' values. This should output json with the message 'Post deleted successfully.'.
I hope this has been helpful.

17 Mar, 2008

07 Oct, 2016

08 Jan, 2007

I am a Full-stack Developer who also started delving into the world of UX/UI Design a few years back. I blog and tweet to hopefully share a little bit of knowledge that can help others around the web. Thanks for stopping by!
Follow
20 May, 2025

11 Jul, 2023

Views: 169,297

Views: 41,862

Views: 39,657

Views: 36,473


