

Written by me@grafxflow
11 Jul, 2023
0
3,855
Updated: 3 April 2024.
As I am sure everybody is aware setup with Laravel can be fairly easy with the help of dependencies. So for this tutorial we will be setting up a basic user login and dashboard, then adding a CRUD user example.
Here are the steps of the tutorial.
Source code can be found at github - here is the link.
So lets start by creating a new project by first choosing your default directory.
cd /Users/[your-username]/Sites
Then setup Laravel in a folder named laravel-inertia-docker-breeze-react-app.
composer create-project laravel/laravel laravel-inertia-docker-breeze-react-app
cd /Users/[your-username]/Sites/laravel-inertia-docker-breeze-react-app
NOTE: Make sure the Docker desktop app is running first
For this project we will be integrating Docker via sail.
composer require laravel/sail --dev
Then let sail setup the Docker instance.
php artisan sail:install
For now choose the default 0 for mysql - we can add additional services to it later.
 Which services would you like to install? [mysql]:
  [0] mysql
  [1] pgsql
  [2] mariadb
  [3] redis
  [4] memcached
  [5] meilisearch
  [6] minio
  [7] mailpit
  [8] selenium
  [9] soketi
 >
NOTE: This initial setup will take longer
Let's get the docker instance up and running.
./vendor/bin/sail up -d
You shoud be able to make sure it's working.
http://localhost
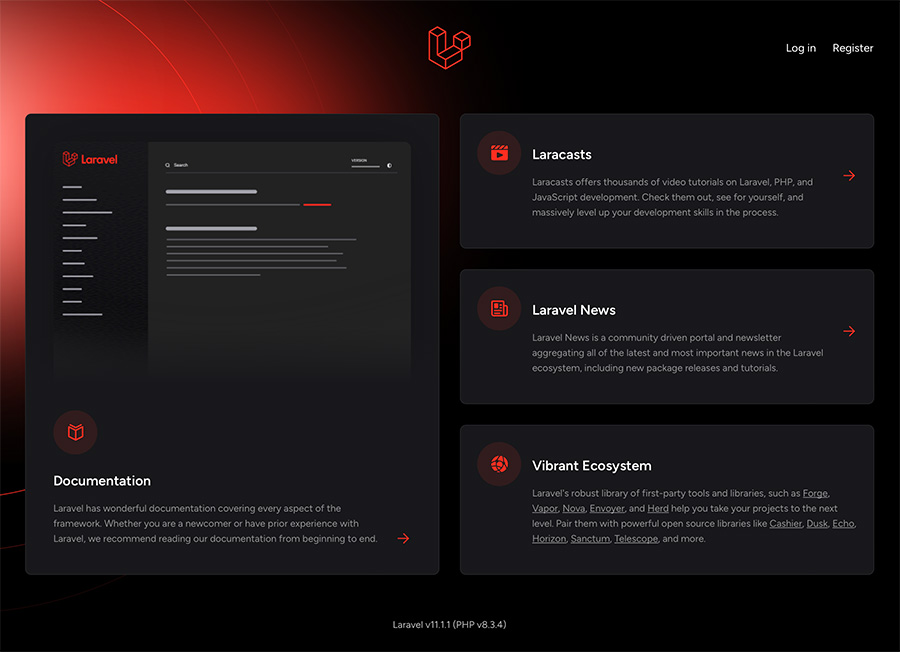
And see the following default page.

Now by default you should already have the .env created and keys generated. So now lets migrate the initial setup.
./vendor/bin/sail php artisan migrate
We now need to add add a user to login into the dashboard - so let's go back in the terminal start adding it with tinker.
./vendor/bin/sail php artisan tinker
Add whatever details you want to use.
$user = new App\Models\User();
$user->password = Hash::make('the-password-of-choice');
$user->email = 'the-email@example.com';
$user->name = 'Admin User';
$user->save();

exit
Now we need to add the Login and Dashboard pages so for this we will use the startup kit via Laravel/breeze.
composer require laravel/breeze --dev
For this setup we will be integrating react.js for the frontend framework (but it could be react etc) and running the below terminal input. This should add inertiajs and tailwind by default plus add inertia's default middleware to the routes.
./vendor/bin/sail php artisan breeze:install react
npm install
npm run dev
Once done you will notice Vite will startup in the terminal.
  VITE v5.2.7  ready in 293 ms

  ➜  Local:   http://localhost:5173/
  ➜  Network: use --host to expose
  ➜  press h + enter to show help

  LARAVEL v11.1.1  plugin v1.0.2

  ➜  APP_URL: http://localhost
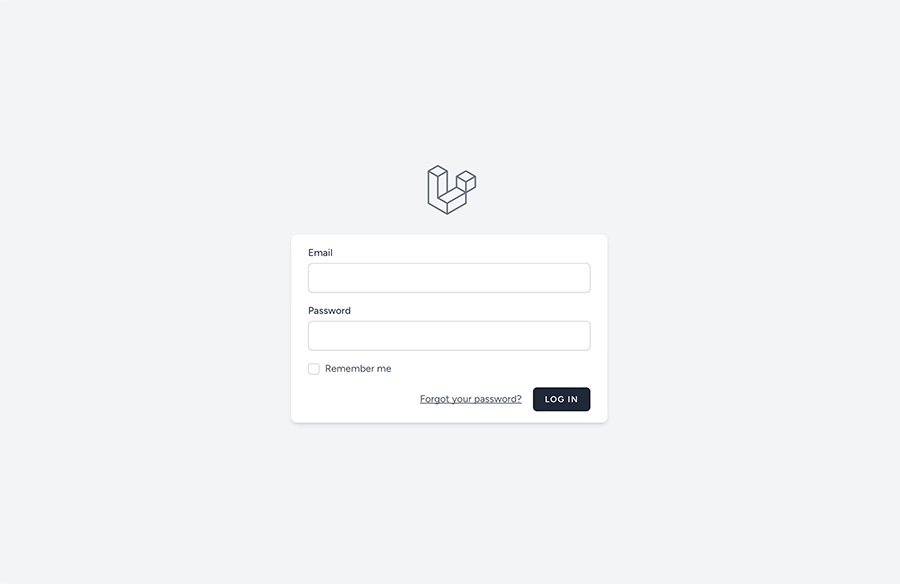
So lets go back to the browser. You should notice the added navigation for 'Login In' and 'Register'.
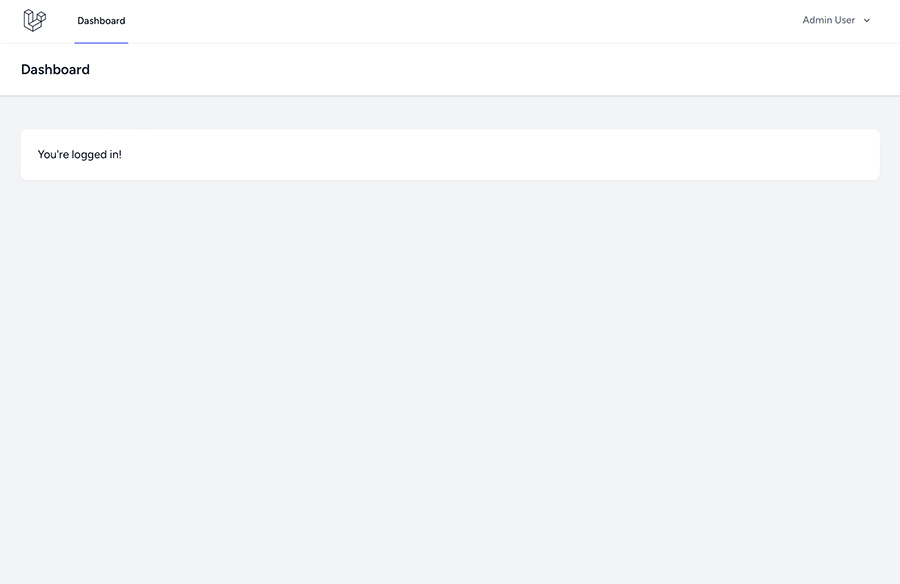
So login to see if your user details work.
... if so you will be redirected to the dashboard.
Now lets have some fun and add some custom pages for CRUD integration for the Active Users.
You should have the following directory 'resources/js/Pages/', so add a new folder called Users - 'resources/js/Pages/Users/'.
Next create the controller for new Users section.
php artisan make:controller UsersController
This should have created the following 'app/Http/Controllers/UsersController.php' so now add the following content.
<?php

namespace App\Http\Controllers;

use Illuminate\Http\Request;
use App\Models\User;
use Inertia\Inertia;
use Inertia\Response;

class UsersController extends Controller
{
    /**
     * Display the active users.
     */
    public function index(Request $request): Response
    {
        return Inertia::render('Users/Index', [
            'users' => User::all(),
        ]);
    }
}
We also want to limit this section to logged in users so make the following change to the web routes file 'routes/web.php'.
<?php

use App\Http\Controllers\ProfileController;
use Illuminate\Foundation\Application;
use Illuminate\Support\Facades\Route;
use Inertia\Inertia;

// Users CRUD Controller
use App\Http\Controllers\UsersController;

Route::middleware('auth')->group(function () {
    Route::get('/profile', [ProfileController::class, 'edit'])->name('profile.edit');
    Route::patch('/profile', [ProfileController::class, 'update'])->name('profile.update');
    Route::delete('/profile', [ProfileController::class, 'destroy'])->name('profile.destroy');

    // Users CRUD routes
    Route::get('/users', [UsersController::class, 'index'])->name('users.index');
});
Also lets add the Active Users link page in the navigation so edit the 'resources/js/Layouts/AuthenticatedLayout.jsx'.
<NavLink href={route('dashboard')} active={route().current('dashboard')}>
    Dashboard
</NavLink>
{/* Add this below the Dashboard Link */}
<NavLink href={route('users.index')} active={route().current('users.index')}>
    Active Users
</NavLink>
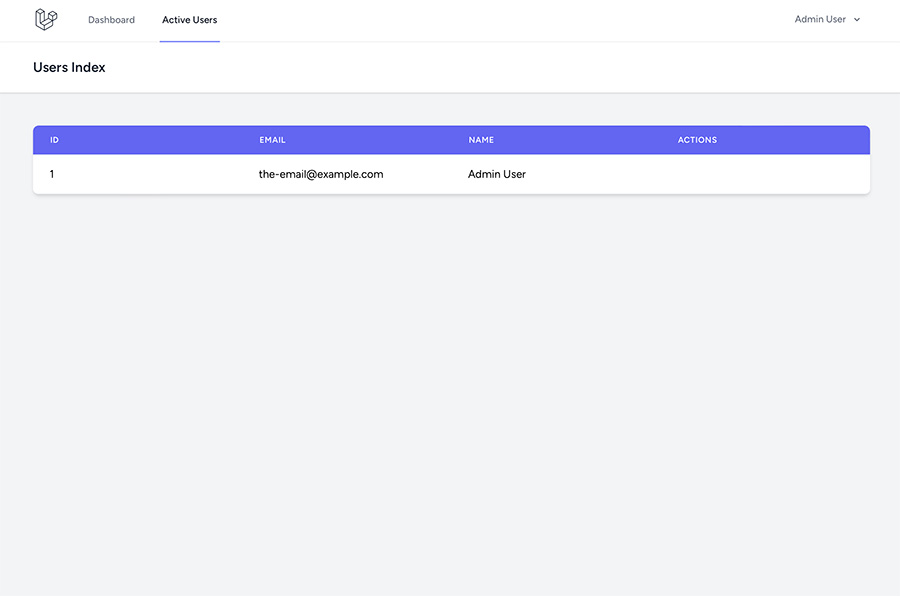
Then create a page to show the users index 'resources/js/Pages/Users/Index.jsx'. I have added a blank Actions column for now which will contain the 'edit' and 'delete' links.
import AuthenticatedLayout from '@/Layouts/AuthenticatedLayout';

export default function Index({ auth, users }) {
    return (
        <AuthenticatedLayout
            user={auth.user}
        >
            <header className="bg-white shadow">
                <div className="max-w-7xl mx-auto py-6 px-4 sm:px-6 lg:px-8">
                    <h2 className="font-semibold text-xl text-gray-800 leading-tight">Users Index</h2>
                </div>
            </header>

            <div className="py-12">
                <div className="mx-auto max-w-7xl sm:px-6 lg:px-8">
                    <div className="overflow-hidden bg-white shadow-md sm:rounded-lg">
                        <div className="flex flex-col">
                            <div className="overflow-x-auto -my-2 sm:-mx-6 lg:-mx-8">
                                <div className="inline-block py-2 min-w-full align-middle sm:px-6 lg:px-8">
                                    <div className="overflow-hidden border-b border-gray-200 shadow sm:rounded-lg">

                                        <table className="min-w-full divide-y divide-gray-200 table-fixed">
                                            <thead className="bg-indigo-500">
                                                <tr>
                                                    <th scope="col" className="w-3/12 text-xs font-semibold tracking-wider text-left text-white uppercase">
                                                        <span className="inline-flex py-3 px-6 w-full justify-between">
                                                            ID
                                                        </span>
                                                    </th>
                                                    <th scope="col" className="w-3/12 text-xs font-semibold tracking-wider text-left text-white uppercase">
                                                        <span className="inline-flex py-3 px-6 w-full justify-between">
                                                            Email
                                                        </span>
                                                    </th>
                                                    <th scope="col" className="w-3/12 text-xs font-semibold tracking-wider text-left text-white uppercase">
                                                        <span className="inline-flex py-3 px-6 w-full justify-between">
                                                            Name
                                                        </span>
                                                    </th>
                                                    <th scope="col" className="w-3/12 text-xs font-semibold tracking-wider text-left text-white uppercase">
                                                        <span className="inline-flex py-3 px-6 w-full justify-between">
                                                            Actions
                                                        </span>
                                                    </th>
                                                </tr>
                                            </thead>
                                            <tbody className="bg-white divide-y divide-gray-200">
                                                {/* Start looping the Users Object */}
                                                { users && users.map( (user) => (
                                                    <tr key={user.id}>
                                                        <td className="py-4 px-6 whitespace-nowrap">
                                                            {user.id}
                                                        </td>
                                                        <td className="py-4 px-6 whitespace-nowrap">
                                                            {user.email}
                                                        </td>
                                                        <td className="py-4 px-6 whitespace-nowrap">
                                                            {user.name}
                                                        </td>
                                                        <td className="py-4 px-6 whitespace-nowrap">
                                                            {/* Start Actions */}
                                                            {/* End Actions */}
                                                        </td>
                                                    </tr>
                                                )) }
                                                {/* End looping the Users Object */}
                                            </tbody>
                                        </table>
                                    </div>
                                </div>
                            </div>
                        </div>
                    </div>
                </div>
            </div>

        </AuthenticatedLayout>
    );
}
You should now see both the navigation and the Users Index page.
Now lets add an edit button with a link to the table 'resources/js/Pages/Users/Index.jsx'.
import { Link } from '@inertiajs/react';

...

{/* Start Actions */}
{/* Start Edit User */}
<Link href={route('users.edit', {user: user.id})}
    className="mr-1 mb-1 px-4 py-2 uppercase text-sm leading-4 border rounded-md hover:bg-white focus:border-indigo-500 focus:text-indigo-500"
>
    Edit
</Link>
{/* End Edit User */}
{/* End Actions */}
Add then add the Edit User page 'resources/js/Pages/Users/Edit.jsx'.
import AuthenticatedLayout from '@/Layouts/AuthenticatedLayout';
import InputError from '@/Components/InputError';
import InputLabel from '@/Components/InputLabel';
import PrimaryButton from '@/Components/PrimaryButton';
import TextInput from '@/Components/TextInput';
import { Link, useForm, usePage } from '@inertiajs/react';


export default function Edit({ auth, user }) {

    const { data, setData, post, processing, errors } = useForm({
        name: user.name,
        email: user.email,
        password: '',
        password_confirmation: '',
    })

    const submit = (e) => {
        e.preventDefault()
        preserveScroll: true

        post(route('users.update', {
            previousState: true,
            onSuccess: () => {
                console.log(data)
            }
        }, data))
    }

    return (
        <AuthenticatedLayout
            user={auth.user}
        >
            <header className="bg-white shadow">
                <div className="max-w-7xl mx-auto py-6 px-4 sm:px-6 lg:px-8 font-bold">
                    <h2 className="font-semibold text-xl text-gray-800 leading-tight">Users Edit</h2>
                </div>
            </header>

            <div className="py-12">
                <div className="max-w-7xl mx-auto sm:px-6 lg:px-8 space-y-6">
                    <div className="p-4 sm:p-8 bg-white shadow sm:rounded-lg">

                        <form onSubmit={submit}>
                            <div className="mt-4">
                                <InputLabel htmlFor="name" value="Name" />

                                <TextInput
                                    id="name"
                                    value={data.name}
                                    onChange={(e) => setData('name', e.target.value)}
                                    type="text"
                                    className="mt-1 block w-full"
                                />

                                {errors.name && <div className="mt-2 text-red-500">{errors.name}</div>}
                            </div>

                            <div className="mt-4">
                                <InputLabel htmlFor="email" value="Email" />

                                <TextInput
                                    id="email"
                                    value={data.email}
                                    onChange={(e) => setData('email', e.target.value)}
                                    type="text"
                                    className="mt-1 block w-full"
                                    autoComplete="email"
                                />

                                {errors.email && <div className="mt-2 text-red-500">{errors.email}</div>}
                            </div>

                            <div className="mt-4">
                                <InputLabel htmlFor="password" value="Password" />

                                <TextInput
                                    id="password"
                                    value={data.password}
                                    onChange={(e) => setData('password', e.target.value)}
                                    type="password"
                                    className="mt-1 block w-full"
                                    autoComplete="new-password"
                                />

                                {errors.password && <div className="mt-2 text-red-500">{errors.password}</div>}
                            </div>

                            <div className="mt-4">
                                <InputLabel htmlFor="password_confirmation" value="Confirm Password" />

                                <TextInput
                                    id="password_confirmation"
                                    value={data.password_confirmation}
                                    onChange={(e) => setData('password_confirmation', e.target.value)}
                                    type="password"
                                    className="mt-1 block w-full"
                                    autoComplete="new-password"
                                />

                                {errors.password_confirmation && <div className="mt-2 text-red-500">{errors.password_confirmation}</div>}
                            </div>

                            <div className="flex items-center justify-end mt-4">
                                <PrimaryButton className="ml-4" disabled={processing}>
                                    Edit User
                                </PrimaryButton>
                            </div>
                        </form>

                    </div>
                </div>
            </div>

        </AuthenticatedLayout>
    );
}
Now before adding the 'Update' function to the UserController lets set up the request rules. So in the terminal input.
php artisan make:request UserUpdateRequest
And edit the following file 'app/Http/Requests/UserUpdateRequest.php'.
<?php

namespace App\Http\Requests;

use App\Models\User;
use Illuminate\Foundation\Http\FormRequest;
use Illuminate\Validation\Rule;

class UserUpdateRequest extends FormRequest
{
    /**
     * Determine if the user is authorized to make this request.
     */
    public function authorize(): bool
    {
        return true;
    }

    /**
     * Get the validation rules that apply to the request.
     *
     * @return array<string, \Illuminate\Contracts\Validation\Rule|array|string>
     */
    public function rules(): array
    {
        return [
            'name' => ['required', 'string', 'max:255'],
            'email' => ['required', 'string', 'lowercase', 'email:filter', 'max:255', Rule::unique(User::class)->ignore($this->user)],
            'password' => ['sometimes', 'nullable', 'confirmed', 'min:8'],
            'current_password' => ['sometimes', 'required_with:password', 'same:password'],
        ];
    }
}
Now back to the controller 'app/Http/Controllers/UsersController.php' add the following.
use Illuminate\Http\RedirectResponse;
use App\Http\Requests\UserUpdateRequest;
use Illuminate\Support\Facades\Redirect;

....

    /**
     * Edit the user account.
     */
    public function edit(Request $request): Response
    {
        return Inertia::render('Users/Edit', [
            'user' => User::find($request->user),
        ]);
    }

    /**
     * Update the user information.
     */
    public function update(UserUpdateUserRequest $request): RedirectResponse
    {
        // Removes password field if it's null
        if (!$request->password) {
            unset($request['password']);
        }

        // Update the User details
        User::find($request->user)->update($request->all());

        // Redirect to the User Index page
        return Redirect::route('users.index');
    }
Then the web routes 'routes/web.php'.
// Users CRUD routes
Route::get('/users', [UsersController::class, 'index'])->name('users.index');
Route::get('/users/{user}/edit', [UsersController::class, 'edit'])->name('users.edit');
Route::patch('/users/{user}/update', [UsersController::class, 'update'])->name('users.update');
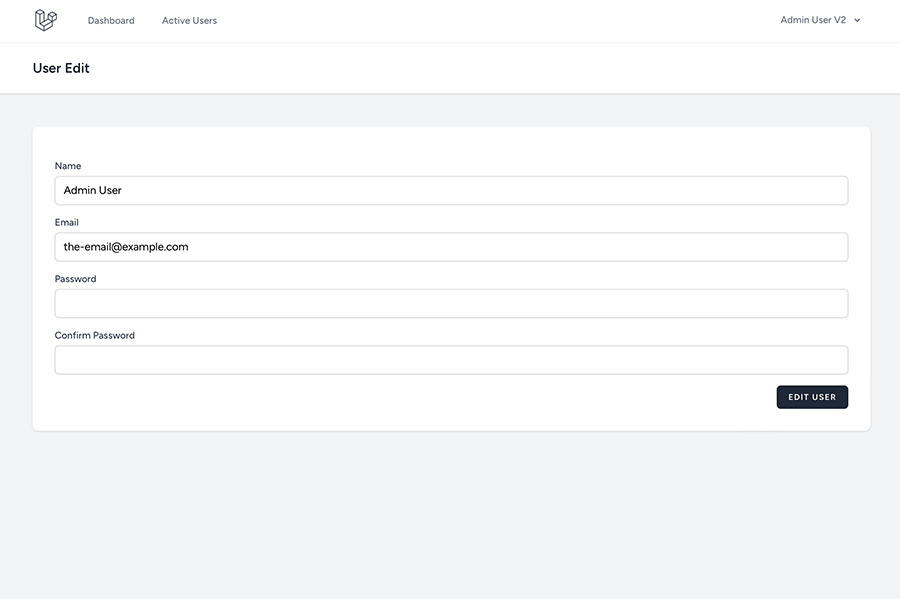
Here is the edit page.
Now we want to add a Delete User function, but for this we want to make it a soft delete - so edit 'app/Models/User.php'.
<?php

namespace App\Models;

// use Illuminate\Contracts\Auth\MustVerifyEmail;
use Illuminate\Database\Eloquent\Factories\HasFactory;
use Illuminate\Foundation\Auth\User as Authenticatable;
use Illuminate\Notifications\Notifiable;
use Laravel\Sanctum\HasApiTokens;
// Use SoftDeletes
use Illuminate\Database\Eloquent\SoftDeletes;

class User extends Authenticatable
{
    // Add SoftDeletes
    use HasApiTokens, HasFactory, Notifiable, SoftDeletes;

    /**
     * The attributes that are mass assignable.
     *
     * @var array<int, string>
     */
    protected $fillable = [
        'name',
        'email',
        'password',
    ];

    /**
     * The attributes that should be hidden for serialization.
     *
     * @var array<int, string>
     */
    protected $hidden = [
        'password',
        'remember_token',
    ];

    /**
     * The attributes that should be cast.
     *
     * @var array<string, string>
     */
    protected $casts = [
        'email_verified_at' => 'datetime',
        'password' => 'hashed',
    ];
}
And add the column in a migration.
php artisan make:migration add_soft_delete_to_users_table --table=users
And add the following to the new migration file.
<?php

use Illuminate\Database\Migrations\Migration;
use Illuminate\Database\Schema\Blueprint;
use Illuminate\Support\Facades\Schema;

return new class extends Migration
{
    /**
     * Run the migrations.
     */
    public function up(): void
    {
        Schema::table('users', function (Blueprint $table) {
            $table->softDeletes();
        });
    }

    /**
     * Reverse the migrations.
     */
    public function down(): void
    {
        Schema::table('users', function (Blueprint $table) {
            $table->dropSoftDeletes();
        });
    }
};
Then run the migration.
./vendor/bin/sail php artisan migrate
Lets go back to the users index page 'resources/js/Pages/Users/Index.vue' and add the delete button, modal and function.
import AuthenticatedLayout from '@/Layouts/AuthenticatedLayout';
import { Link, useForm } from '@inertiajs/react';
import { useRef, useState } from 'react';
import DangerButton from '@/Components/DangerButton';
import Modal from '@/Components/Modal';
import InputError from '@/Components/InputError';
import InputLabel from '@/Components/InputLabel';
import SecondaryButton from '@/Components/SecondaryButton';
import TextInput from '@/Components/TextInput';

export default function Index({ auth, users }) {
    const [confirmingUserDeletion, confirmingUserDelete] = useState(false);
    const userId = useRef(null);

    const { setData, delete: destroy, processing, reset, errors } = useForm();

    const confirmUserDelete = (id) => {
        confirmingUserDelete(true);
        userId.value = id;
    };

    const deleteUser = (e) => {
        preserveScroll: true
        destroy(route('users.delete', {user: userId.value}), {
            preserveScroll: true,
            onSuccess: () => closeModal(),
            onFinish: () => reset(),
        });
    };

    const closeModal = () => {
        confirmingUserDelete(false);
        reset();
    };

    return (
        <AuthenticatedLayout
            user={auth.user}
        >
            <header className="bg-white shadow">
                <div className="max-w-7xl mx-auto py-6 px-4 sm:px-6 lg:px-8">
                    <h2 className="font-semibold text-xl text-gray-800 leading-tight">Users Index</h2>
                </div>
            </header>

            <div className="py-12">
                <div className="mx-auto max-w-7xl sm:px-6 lg:px-8">
                    <div className="overflow-hidden bg-white shadow-md sm:rounded-lg">
                        <div className="flex flex-col">
                            <div className="overflow-x-auto -my-2 sm:-mx-6 lg:-mx-8">
                                <div className="inline-block py-2 min-w-full align-middle sm:px-6 lg:px-8">
                                    <div className="overflow-hidden border-b border-gray-200 shadow sm:rounded-lg">

                                        <table className="min-w-full divide-y divide-gray-200 table-fixed">
                                            <thead className="bg-indigo-500">
                                                <tr>
                                                    <th scope="col" className="w-3/12 text-xs font-semibold tracking-wider text-left text-white uppercase">
                                                        <span className="inline-flex py-3 px-6 w-full justify-between">
                                                            ID
                                                        </span>
                                                    </th>
                                                    <th scope="col" className="w-3/12 text-xs font-semibold tracking-wider text-left text-white uppercase">
                                                        <span className="inline-flex py-3 px-6 w-full justify-between">
                                                            Email
                                                        </span>
                                                    </th>
                                                    <th scope="col" className="w-3/12 text-xs font-semibold tracking-wider text-left text-white uppercase">
                                                        <span className="inline-flex py-3 px-6 w-full justify-between">
                                                            Name
                                                        </span>
                                                    </th>
                                                    <th scope="col" className="w-3/12 text-xs font-semibold tracking-wider text-left text-white uppercase">
                                                        <span className="inline-flex py-3 px-6 w-full justify-between">
                                                            Actions
                                                        </span>
                                                    </th>
                                                </tr>
                                            </thead>
                                            <tbody className="bg-white divide-y divide-gray-200">
                                                {/* Start looping the Users Object */}
                                                { users && users.map( (user) => (
                                                    <tr key={user.id}>
                                                        <td className="py-4 px-6 whitespace-nowrap">
                                                            {user.id}
                                                        </td>
                                                        <td className="py-4 px-6 whitespace-nowrap">
                                                            {user.email}
                                                        </td>
                                                        <td className="py-4 px-6 whitespace-nowrap">
                                                            {user.name}
                                                        </td>
                                                        <td className="py-4 px-6 whitespace-nowrap">
                                                            {/* Start Actions */}
                                                            {/* Start Edit User */}
                                                            <Link href={route('users.edit', {user: user.id})}
                                                                className="mr-1 mb-1 px-4 py-2 uppercase text-sm leading-4 border rounded-md hover:bg-white focus:border-indigo-500 focus:text-indigo-500"
                                                            >
                                                                Edit
                                                            </Link>
                                                            {/* End Edit User */}
                                                            {/* Start Soft Delete User */}
                                                            <DangerButton className="ms-3" onClick={() => confirmUserDelete(user.id)}>
                                                                Delete
                                                            </DangerButton>
                                                            {/* End Soft Delete User */}
                                                            {/* End Actions */}
                                                        </td>
                                                    </tr>
                                                )) }
                                                {/* End looping the Users Object */}
                                            </tbody>
                                        </table>

                                    </div>
                                </div>
                            </div>
                        </div>
                    </div>
                </div>
            </div>

            <Modal show={confirmingUserDeletion} onClose={closeModal}>
                <div className="p-6">
                    <h2 className="text-lg font-medium text-gray-900">
                        Are you sure you want to delete the user?
                    </h2>
                    <div className="mt-6 flex justify-end">
                        <SecondaryButton onClick={closeModal}>Cancel</SecondaryButton>
                        <DangerButton className="ms-3" disabled={processing} onClick={() => deleteUser(userId)}>
                            Delete Account
                        </DangerButton>
                    </div>
                </div>
            </Modal>

        </AuthenticatedLayout>
    );
}
Then add the delete route to the web routes 'routes/web.php'.
// Users CRUD routes
Route::get('/users', [UsersController::class, 'index'])->name('users.index');
Route::get('/users/{user}/edit', [UsersController::class, 'edit'])->name('users.edit');
Route::patch('/users/{user}/update', [UsersController::class, 'update'])->name('users.update');
Route::delete('/users/delete', [UsersController::class, 'delete'])->name('users.delete');
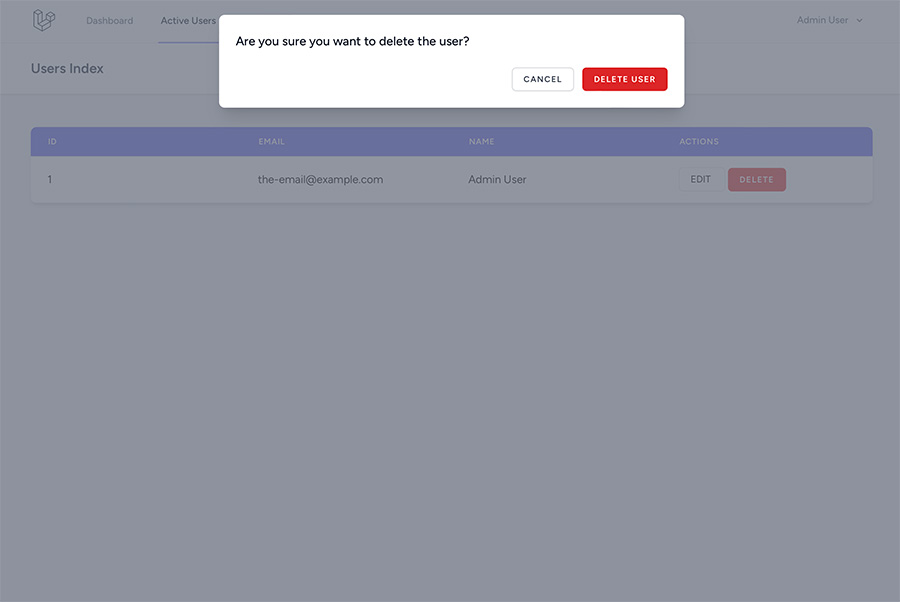
Now lets add the delete function to the UsersController.
  /**
   * Delete the user account.
   */
  public function delete(Request $request): RedirectResponse
  {
    User::find($request->user)->delete();

    return Redirect::route('users.index');
  }
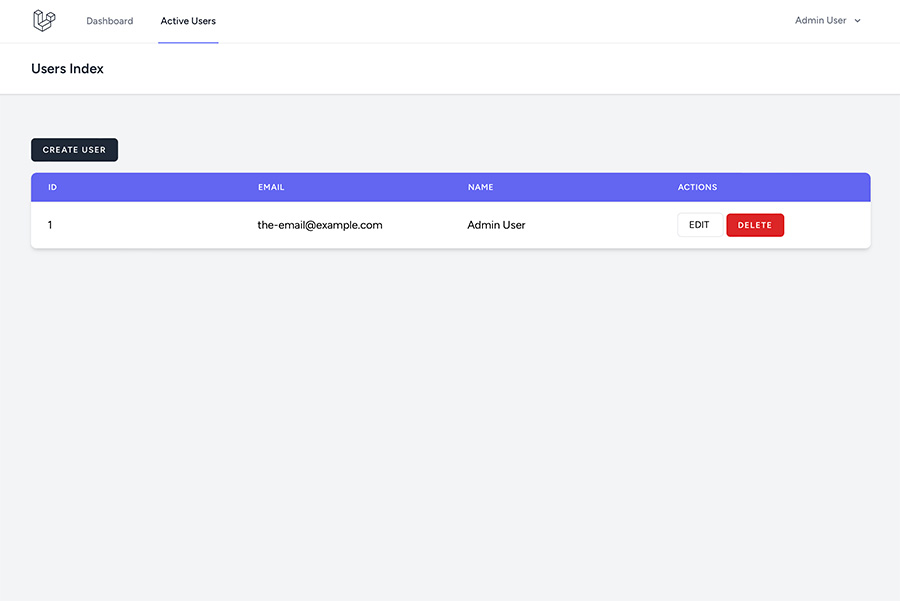
Here is now what should appear on the User Index page.
We also want the option to be able to add a new user, so lets start by creating the add user page 'resources/js/Pages/Users/Create.jsx'.
import AuthenticatedLayout from '@/Layouts/AuthenticatedLayout';
import InputError from '@/Components/InputError';
import InputLabel from '@/Components/InputLabel';
import PrimaryButton from '@/Components/PrimaryButton';
import TextInput from '@/Components/TextInput';
import { Link, useForm, usePage } from '@inertiajs/react';

export default function Create({ auth, user }) {

    const { data, setData, post, processing, errors } = useForm({
        name: '',
        email: '',
        password: '',
        password_confirmation: '',
    })

    const submit = (e) => {
        e.preventDefault()
        preserveScroll: true

        post(route('users.store', {
            previousState: true,
            onSuccess: () => {
                console.log(data)
            }
        }, data))
    }

    return (
        <AuthenticatedLayout
            user={auth.user}
        >
            <header className="bg-white shadow">
                <div className="max-w-7xl mx-auto py-6 px-4 sm:px-6 lg:px-8 font-bold">
                    <h2 className="font-semibold text-xl text-gray-800 leading-tight">Users Edit</h2>
                </div>
            </header>

            <div className="py-12">
                <div className="max-w-7xl mx-auto sm:px-6 lg:px-8 space-y-6">
                    <div className="p-4 sm:p-8 bg-white shadow sm:rounded-lg">

                        <form onSubmit={submit}>
                            <div className="mt-4">
                                <InputLabel htmlFor="name" value="Name" />

                                <TextInput
                                    id="name"
                                    value={data.name}
                                    onChange={(e) => setData('name', e.target.value)}
                                    type="text"
                                    className="mt-1 block w-full"
                                />

                                {errors.name && <div className="mt-2 text-red-500">{errors.name}</div>}
                            </div>

                            <div className="mt-4">
                                <InputLabel htmlFor="email" value="Email" />

                                <TextInput
                                    id="email"
                                    value={data.email}
                                    onChange={(e) => setData('email', e.target.value)}
                                    type="text"
                                    className="mt-1 block w-full"
                                    autoComplete="email"
                                />

                                {errors.email && <div className="mt-2 text-red-500">{errors.email}</div>}
                            </div>

                            <div className="mt-4">
                                <InputLabel htmlFor="password" value="Password" />

                                <TextInput
                                    id="password"
                                    value={data.password}
                                    onChange={(e) => setData('password', e.target.value)}
                                    type="password"
                                    className="mt-1 block w-full"
                                    autoComplete="new-password"
                                />

                                {errors.password && <div className="mt-2 text-red-500">{errors.password}</div>}
                            </div>

                            <div className="mt-4">
                                <InputLabel htmlFor="password_confirmation" value="Confirm Password" />

                                <TextInput
                                    id="password_confirmation"
                                    value={data.password_confirmation}
                                    onChange={(e) => setData('password_confirmation', e.target.value)}
                                    type="password"
                                    className="mt-1 block w-full"
                                    autoComplete="new-password"
                                />

                                {errors.password_confirmation && <div className="mt-2 text-red-500">{errors.password_confirmation}</div>}
                            </div>

                            <div className="flex items-center justify-end mt-4">
                                <PrimaryButton className="ml-4" disabled={processing}>
                                    Create User
                                </PrimaryButton>
                            </div>
                        </form>

                    </div>
                </div>
            </div>

        </AuthenticatedLayout>
    );
}
Then update the web routes in order to store the new user.
// Users CRUD routes
Route::get('/users', [UsersController::class, 'index'])->name('users.index');
Route::get('/users/{user}/edit', [UsersController::class, 'edit'])->name('users.edit');
Route::patch('/users/{user}/update', [UsersController::class, 'update'])->name('users.update');
Route::delete('/users/{user}/delete', [UsersController::class, 'delete'])->name('users.delete');
Route::get('/users/create', [UsersController::class, 'create'])->name('users.create');
Route::post('/users/store', [UsersController::class, 'store'])->name('users.store');
Now add the Store and Create functions in the UsersController.
use Illuminate\Support\Facades\Hash;
use App\Http\Requests\UserStoreRequest;

...

    /**
     * Create the user account.
     */
    public function create(): Response
    {
        return Inertia::render('Users/Create');
    }

    /**
     * Store the user account.
     */
    public function store(UserStoreRequest $request): RedirectResponse
    {
        // Store the User details
        User::create([
            'name' => $request->name,
            'email' => $request->email,
            'password' => Hash::make($request->password),
        ]);

        return Redirect::route('users.index');
    }
And now add a Create User button on the users index page.
import AuthenticatedLayout from '@/Layouts/AuthenticatedLayout';
import { Link, useForm } from '@inertiajs/react';
import { useRef, useState } from 'react';
import DangerButton from '@/Components/DangerButton';
import Modal from '@/Components/Modal';
import InputError from '@/Components/InputError';
import InputLabel from '@/Components/InputLabel';
import SecondaryButton from '@/Components/SecondaryButton';
import TextInput from '@/Components/TextInput';

export default function Index({ auth, users }) {
    const [confirmingUserDeletion, confirmingUserDelete] = useState(false);
    const userId = useRef(null);

    const { setData, delete: destroy, processing, reset, errors } = useForm();

    const confirmUserDelete = (id) => {
        confirmingUserDelete(true);
        userId.value = id;
    };

    const deleteUser = (e) => {
        preserveScroll: true
        destroy(route('users.delete', {user: userId.value}), {
            preserveScroll: true,
            onSuccess: () => closeModal(),
            onFinish: () => reset(),
        });
    };

    const closeModal = () => {
        confirmingUserDelete(false);
        reset();
    };

    return (
        <AuthenticatedLayout
            user={auth.user}
        >
            <header className="bg-white shadow">
                <div className="max-w-7xl mx-auto py-6 px-4 sm:px-6 lg:px-8">
                    <h2 className="font-semibold text-xl text-gray-800 leading-tight">Users Index</h2>
                </div>
            </header>

            <div className="py-12">
                <div className="mx-auto max-w-7xl sm:px-6 lg:px-8">

                    {/* Start Create User */}
                    <Link href={route('users.create')} className="inline-flex items-center my-4 px-4 py-2 bg-gray-800 border border-transparent rounded-md font-semibold text-xs text-white uppercase tracking-widest hover:bg-gray-700 focus:bg-gray-700 active:bg-gray-900 focus:outline-none focus:ring-2 focus:ring-indigo-500 focus:ring-offset-2 transition ease-in-out duration-150"
                    >
                        Create User
                    </Link>
                    {/* End Create User */}

                    <div className="overflow-hidden bg-white shadow-md sm:rounded-lg">
                        <div className="flex flex-col">
                            <div className="overflow-x-auto -my-2 sm:-mx-6 lg:-mx-8">
                                <div className="inline-block py-2 min-w-full align-middle sm:px-6 lg:px-8">
                                    <div className="overflow-hidden border-b border-gray-200 shadow sm:rounded-lg">

                                        <table className="min-w-full divide-y divide-gray-200 table-fixed">
                                            <thead className="bg-indigo-500">
                                                <tr>
                                                    <th scope="col" className="w-3/12 text-xs font-semibold tracking-wider text-left text-white uppercase">
                                                        <span className="inline-flex py-3 px-6 w-full justify-between">
                                                            ID
                                                        </span>
                                                    </th>
                                                    <th scope="col" className="w-3/12 text-xs font-semibold tracking-wider text-left text-white uppercase">
                                                        <span className="inline-flex py-3 px-6 w-full justify-between">
                                                            Email
                                                        </span>
                                                    </th>
                                                    <th scope="col" className="w-3/12 text-xs font-semibold tracking-wider text-left text-white uppercase">
                                                        <span className="inline-flex py-3 px-6 w-full justify-between">
                                                            Name
                                                        </span>
                                                    </th>
                                                    <th scope="col" className="w-3/12 text-xs font-semibold tracking-wider text-left text-white uppercase">
                                                        <span className="inline-flex py-3 px-6 w-full justify-between">
                                                            Actions
                                                        </span>
                                                    </th>
                                                </tr>
                                            </thead>
                                            <tbody className="bg-white divide-y divide-gray-200">
                                                {/* Start looping the Users Object */}
                                                { users && users.map( (user) => (
                                                    <tr key={user.id}>
                                                        <td className="py-4 px-6 whitespace-nowrap">
                                                            {user.id}
                                                        </td>
                                                        <td className="py-4 px-6 whitespace-nowrap">
                                                            {user.email}
                                                        </td>
                                                        <td className="py-4 px-6 whitespace-nowrap">
                                                            {user.name}
                                                        </td>
                                                        <td className="py-4 px-6 whitespace-nowrap">
                                                            {/* Start Actions */}
                                                            {/* Start Edit User */}
                                                            <Link href={route('users.edit', {user: user.id})}
                                                                className="mr-1 mb-1 px-4 py-2 uppercase text-sm leading-4 border rounded-md hover:bg-white focus:border-indigo-500 focus:text-indigo-500"
                                                            >
                                                                Edit
                                                            </Link>
                                                            {/* End Edit User */}
                                                            {/* Start Soft Delete User */}
                                                            <DangerButton className="ms-3" onClick={() => confirmUserDelete(user.id)}>
                                                                Delete
                                                            </DangerButton>
                                                            {/* End Soft Delete User */}
                                                            {/* End Actions */}
                                                        </td>
                                                    </tr>
                                                )) }
                                                {/* End looping the Users Object */}
                                            </tbody>
                                        </table>

                                    </div>
                                </div>
                            </div>
                        </div>
                    </div>
                </div>
            </div>

            <Modal show={confirmingUserDeletion} onClose={closeModal}>
                <div className="p-6">
                    <h2 className="text-lg font-medium text-gray-900">
                        Are you sure you want to delete the user?
                    </h2>
                    <div className="mt-6 flex justify-end">
                        <SecondaryButton onClick={closeModal}>Cancel</SecondaryButton>
                        <DangerButton className="ms-3" disabled={processing} onClick={() => deleteUser(userId)}>
                            Delete Account
                        </DangerButton>
                    </div>
                </div>
            </Modal>

        </AuthenticatedLayout>
    );
}
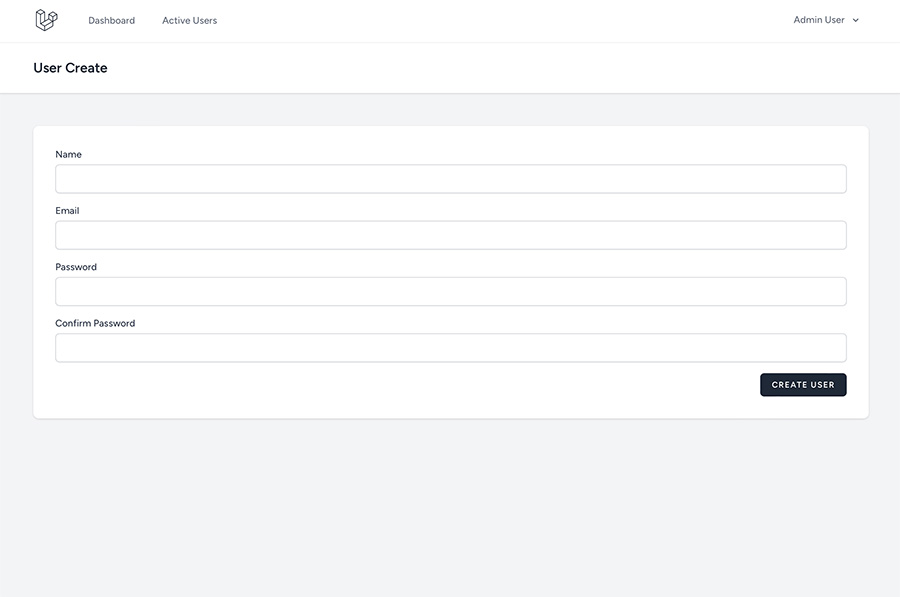
You will now have a Create User button and this Create User page.
Hope this has been helpful!

07 Oct, 2016

26 Apr, 2018
13 Dec, 2016

I am a Full-stack Developer who also started delving into the world of UX/UI Design a few years back. I blog and tweet to hopefully share a little bit of knowledge that can help others around the web. Thanks for stopping by!
Follow
11 Jul, 2023

21 Jun, 2023

Views: 166,093

Views: 40,208

Views: 36,920

Views: 33,515


