
Written by me@grafxflow
17 Mar, 2008
64
169,266
UPDATE: Shadow catcher is now a built-in material and compositing feature in version Cinema 4D R18 onwards by default.
Part 1 - install the plugin and create a basic 3D scene (This page).
Part 2 - use Advanced Compositing to separate the object and shadow alphas... view it here.
What does the shadow catcher plugin allow?
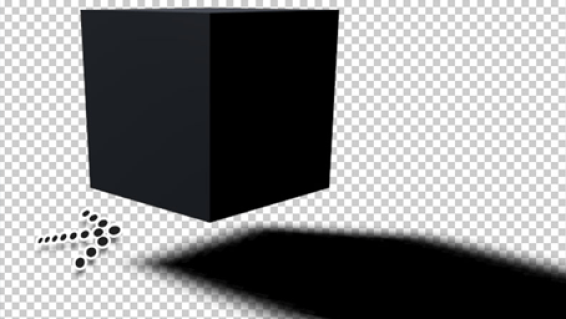
Here is the scenario, we have a 3D character walking across the floor while casting a shadow. We want to composite this with an image in photoshop. Using shadow catcher we can render the character and shadow (with alpha) without the floor. Very useful.
Before starting... I had been searching for ages to try and find the C4D ShadowCatcher plugin. Luckily after pages and pages I finally managed to track it down back in 2008. So for this tutorial you can download it from this site (It's FREE). It has been tested in Cinema 4D R9 through to R17.
DOWNLOAD: ShadowCatcher for C4D repo
First quit C4D if it is running.
Then unzip the download and place it in the C4D plugins folder (Should be found in the same directory as the application)
MAC = Applications/MAXON/plugins/ShadowCatcher.cob
or
PC = C:/program files/MAXON/plugins/ShadowCatcher.cob
Now start C4D.
Lets create a scene and place a box hovering over a plane.
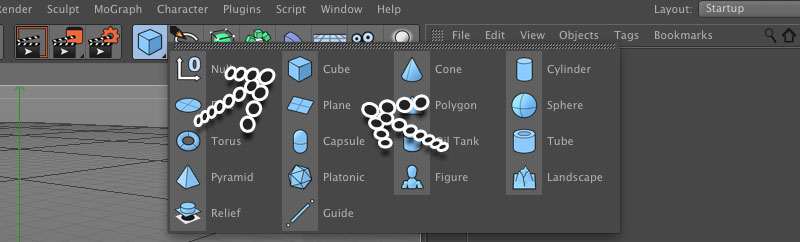
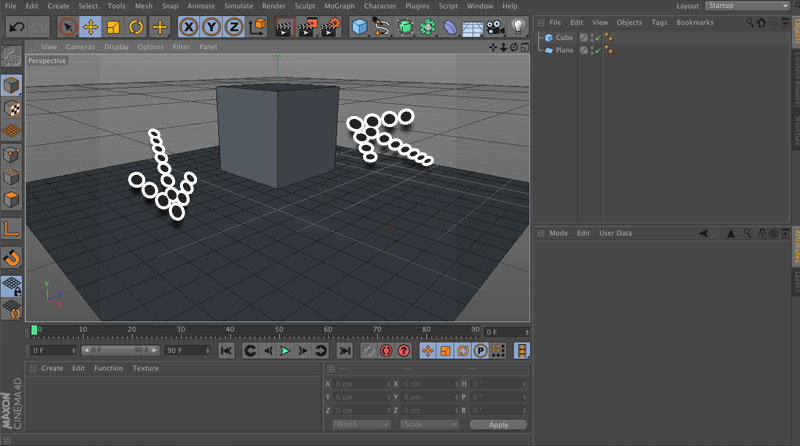
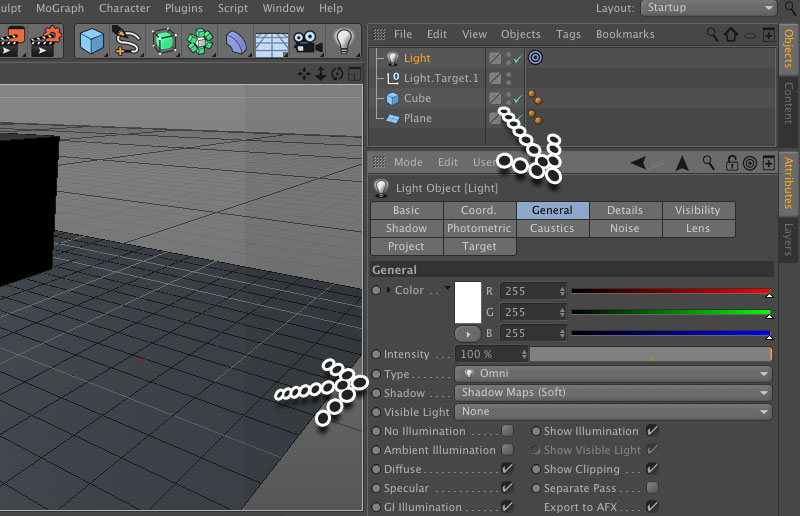
Then add a light with a target.
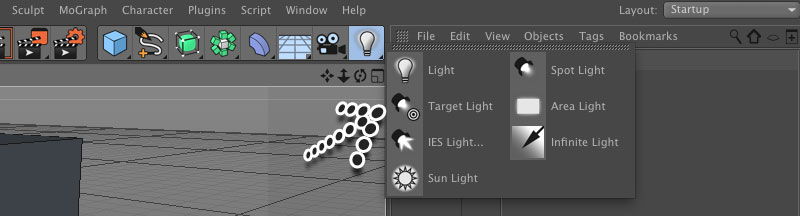
Choose the 'General' settings tab and change the following, 'Type' to 'Omni' and 'Shadow' to 'Shadow Maps (Soft)'.
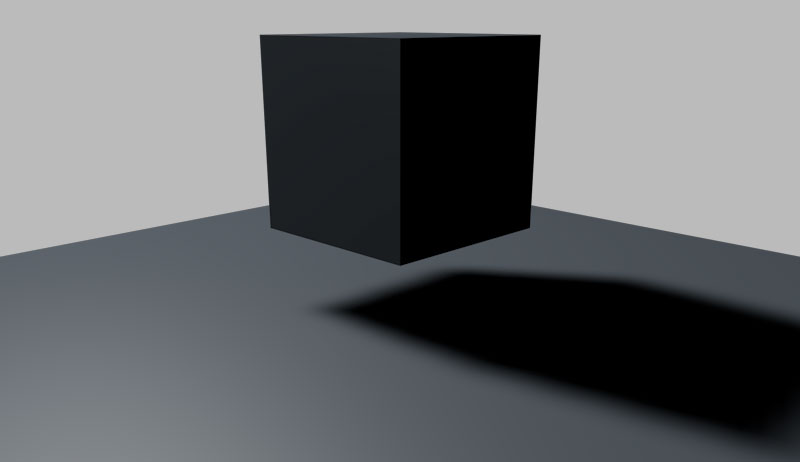
Lets do a quick render...
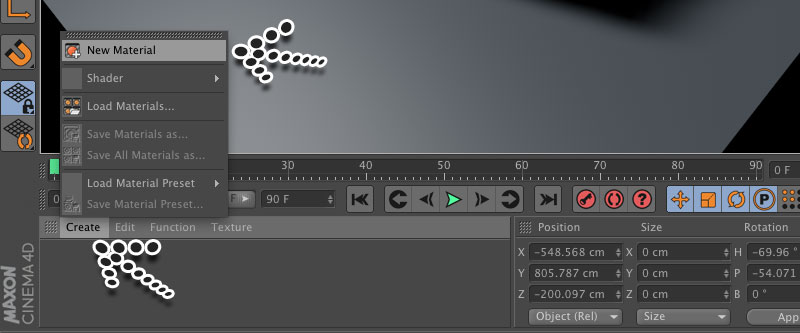
Now apply a new material to the plain (this is what we want to act as our shadow catcher).
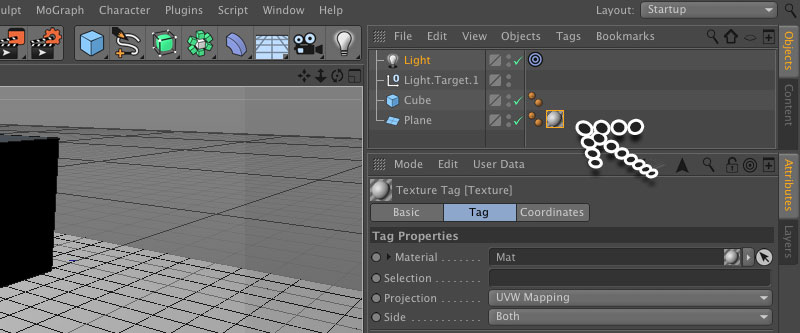
In the new material editor change the properties by unselecting everything except the alpha. NOTE: You may also want to check the transparency if you want to composite the shadow on a background image/video because by default it will be a pure black shadow.
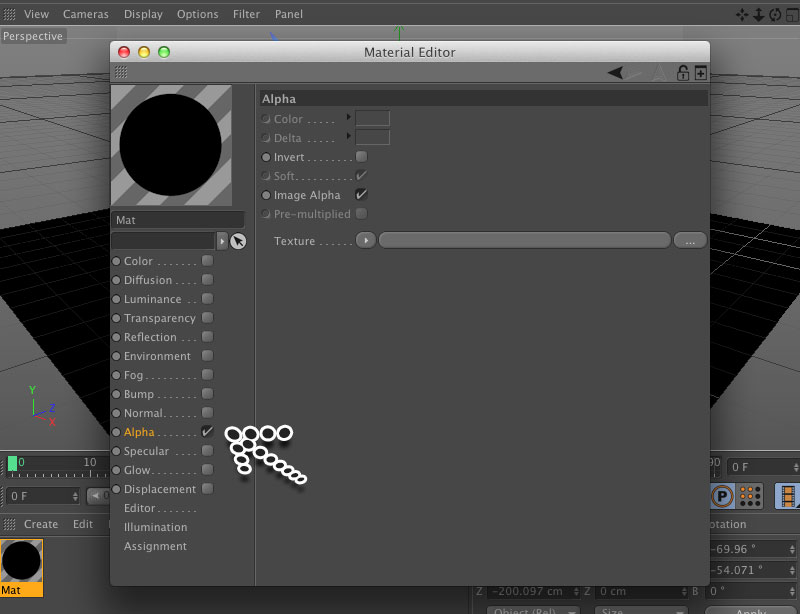
In the alpha properties, click the down arrow next to texture and choose 'Shadow Catcher' (it should be near the bottom). You will also have to select 'Invert' option. If done correctly the material preview should be transparent.
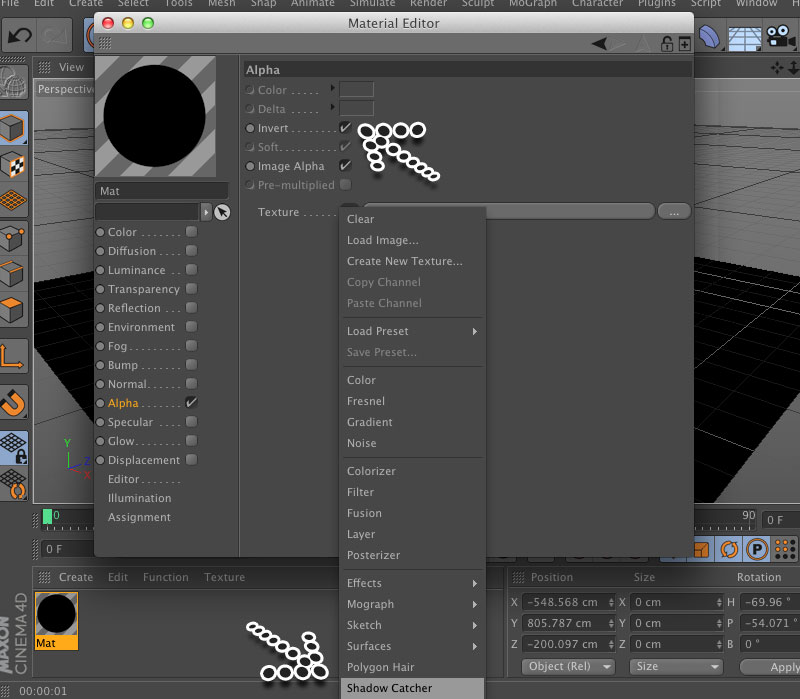
Now lets go to the Render/render settings.
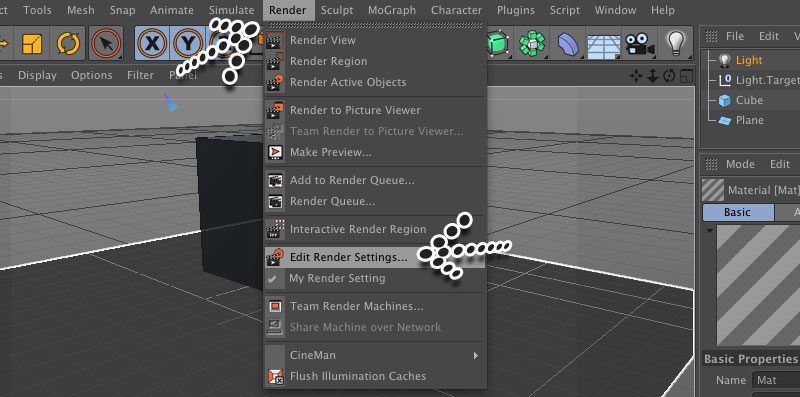
Now depending on which version of C4D the popup window will have a slightly different layout but the options are similar. So choose the 'Anti-Aliasing' option and change 'Anti-Aliasing' to 'Best'.
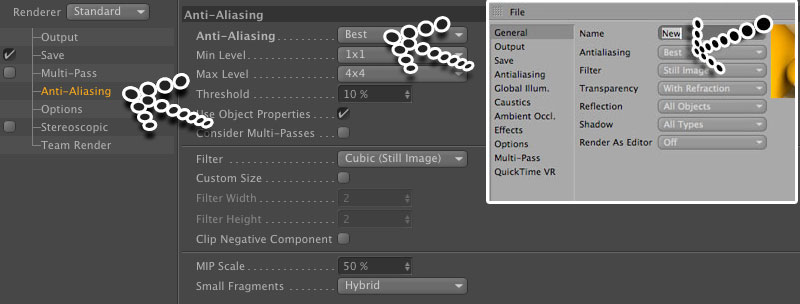
In the 'Save' tab, check the 'Alpha Channel' (The important bit!).
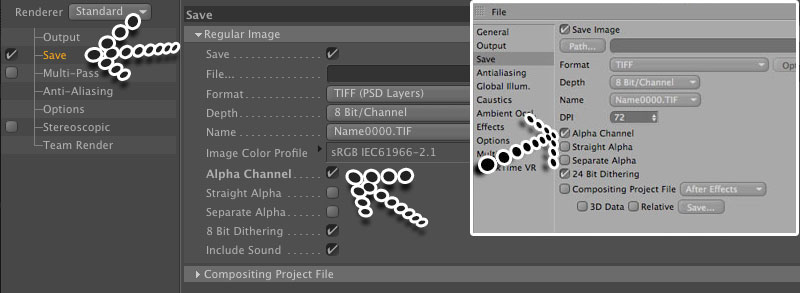
Choose one of the following:
1. If using in After Effects render as tiff frames and use the import tiff frames option in After Effects.
2. If using in Photoshop render the frame as a png format which will allow the transparency to appear straight away.
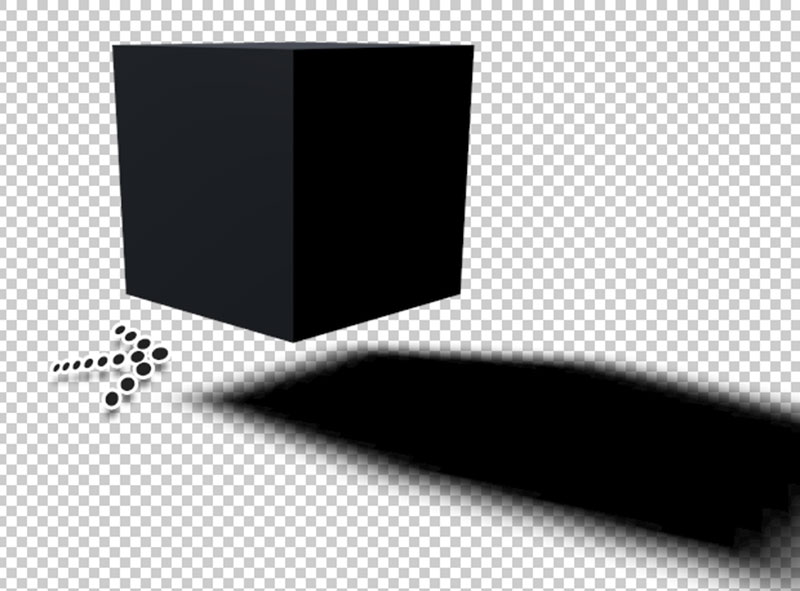
We're done!
There is a Part 2 - use Advanced Compositing to seperate the objects and shadows alphas... view it here.

12 Jan, 2010

08 Jan, 2007

12 Jan, 2010

I am a Full-stack Developer who also started delving into the world of UX/UI Design a few years back. I blog and tweet to hopefully share a little bit of knowledge that can help others around the web. Thanks for stopping by!
Follow
20 May, 2025

11 Jul, 2023

Views: 169,266

Views: 41,845

Views: 39,628

Views: 36,457


64 Response
Alvaro Alvarado
28 Nov 2012
Excelente plugin thanks for the support
me@grafxflow
28 Nov 2012
Glad to help
LmWolfSpirit
28 Nov 2012
Thank you. I am just learning C4D, and this looks like it will be very helpful.
adam
27 Jan 2013
help!
r13 OR r14 can't work...
me@grafxflow
27 Jan 2013
I have used it in C4D R13 and it works perfectly. What is the exact problem you are having?
Paul
12 Feb 2013
Any way of making this work with Sketch & Toon enabled? It just renders the plane with a full, solid white alpha. I've got it working fine without sketch & toon.
me@grafxflow
12 Feb 2013
I am not sure if this will work with Sketch & Toon enabled or if it's even possible at all.
Maybe try:
Paul
12 Feb 2013
Aha - found the solution: I just excluded the plane from rendering by putting it in:
Render Settings > Sketch and Toon > Render > Mode: Exclude
The shadow still rendered on the alpha correctly.
Paul
12 Feb 2013
Wow - what a lightning fast reply! Thanks for your suggestions!
- Paul
me@grafxflow
12 Feb 2013
It seems your solutions better and easier, thanks for sharing it.
Solution is in message below...
Paul
12 Feb 2013
The only thing that now remains is how to anti-alias the shadow. Everything in the alpha channel has lovely smooth edges, apart from the shadow. Very odd.
me@grafxflow
12 Feb 2013
Have you set the Anti-Aliasing to best?
Just did a test render using your solution and looked okay in photoshop.
Paul
12 Feb 2013
I want to have hard-edged shadows, so used the Raytraced (Hard) option. When I use soft shadows, it looks fine. But I've just tried Area shadows, and that gives me a fairly hard-edged shadow, nicely anti-aliased and doesn't take long to render.
me@grafxflow
12 Feb 2013
Try using an 'infinite' light for rendering the 'Raytraced (hard)' shadow.
And in the 'Sketch and Toon' settings choose the 'Shading' tab and set 'Background' to 'Off'.
Andy
25 Feb 2013
Does this work with GI cant get it too work.
me@grafxflow
25 Feb 2013
This plugging is meant for use with any of the built in C4D lights (Spot, Infinite etc) which is capable of casting shadows.
Tom Stracke
27 Feb 2013
Hi!! Great plugin !!! :) but GI Shadows appears not to work. There is a workaround? thx in adv!!
Muhamed
08 Mar 2013
My friend, it doesn't work with GI.
Can anybody help me with it?
Even when i use one of the greyscalegorilla's studio lights, it appears not to work :SS
PS: thanks for the plugin :)
Mack
10 Mar 2013
Hi, i have the same problem, doesn't work with GI, i'm also rendering an EXR multi-pass file and the show pass is also empty.
Thnx for the plugin
Mack
10 Mar 2013
*Shadow pass
Youandi
07 Aug 2013
Works really nice using HDRI with flat floors to generate shadows, saves you some photoshop time
Josh P
20 Nov 2013
Great plugin. Would be amazing if you could get AO to translate also.
Marko Radak
03 Dec 2013
The only downside is that my render is never fully transparent - it always have a bit of the opacity, about 4-5%
Anyway to fix this?
me@grafxflow
06 Dec 2013
Does the texture that contains the transparent shadow still have 'specular' selected?
Gokhan
23 Jan 2014
Hi,firstly thank you very much for great plugin but I have a problem about Physical Render in R15...
maybe my mistake but I can't correct result with Physical Render?
do you have an idea?
Thanks mate.
me@grafxflow
23 Jan 2014
Hi Gokhan,
I am not sure what the issue is? Can you go into more detail.
cheers
Paul
Teemu
19 Aug 2014
Is it possible to export with shadow catcher also normal alpha channel without shadows? Or do i need to render image with shadow catcher and without to get bot alpha channels?
Thanks for the answer!
me@grafxflow
19 Aug 2014
I am not sure if I totally understand you correctly, but maybe you could add a 'Compositing Tag' to each object then in the 'Object Buffer' tab give each its own individual number. Also make sure to do a multi-pass render then add each 'Object Buffer'. This should work for after effects.
Daryl
21 Aug 2014
I just wanted to say thank you for such a great plugin and an even better user friendly instruction. I really like your style overall on everything you do. Great work. Thank You.
me@grafxflow
21 Aug 2014
Always glad to help.
Teemu
26 Aug 2014
Thanks grafxflow, for suggestion was right, thanks for the help!
And thanks for the plugin, it helped me to get one image done easier..
Alpha_editor
22 Oct 2014
Nice Plug-in! I have an issue. I am in C4d R16. I can get the plugin to render fine in the "Standard" renderer. When I switch to the "Physical" Renderer the shadow is a "no show". I have tried all forms of compositing tags, etc. Nothing in the physical renderer is coming through. As soon as I switch to Standard render all works exactly as it should. I am compositing in AE CC 2014 via png sequences. Do you have a work around for this issue?
me@grafxflow
22 Oct 2014
Unfortunately it doesn't work with renders using physical/global illumination. I had somebody else with the same problem in a previous comment so to solve it...
The best way to go is to do add a ‘Compositing Tag’ to each object then in the ‘Object Buffer’ tab give each its own individual number. Also make sure to do a multi-pass render then add each ‘Object Buffer’. This should work for after effects.
Hope it helps or gives you are starting point.
mauro
09 Feb 2015
Hi, thank a lot...
I have a problem with Cineware layers.
I can't get it to work. Am I doing something wrong?
Cheerss
me@grafxflow
10 Feb 2015
Hi Mauro,
From what I understand Cineware relates to importing C4D files direct into After Effects. So I am unsure if Shadow Catcher will still be able to work this way.
Vincent
12 Oct 2015
This works really well but It isn't completely transparent when rendering to a png using the picture frame. How do I make it completely transparent?
me@grafxflow
12 Oct 2015
Does the shadow catcher texture have everything unchecked apart from the alpha?
Oleg
02 Dec 2015
I can't dowload plugin by link: https://grafxflow.co.uk/storage/app/media/blog-downloads/139/ShadowCatcherFinal.zip
me@grafxflow
02 Dec 2015
Hi Oleg,
I have tested the link and it's working fine. What browser are you using?
Geoffrey
23 Dec 2015
I'm using R16. When I set everything as you laid out (Really great step-by-step) I can't get it to work. When I have the plane on with no material it worked and the shadows were there. When I applied the material according to your instructions, the plane is black and not accepting any shadows.
Thanks!
Geoffrey
23 Dec 2015
One more thing, I using cineware, but the shadows are not showing up in C4D.
me@grafxflow
26 Dec 2015
Hi Geoffrey,
Are you using something like Global Illumination in the advanced render settings?
Mauro
02 Jan 2016
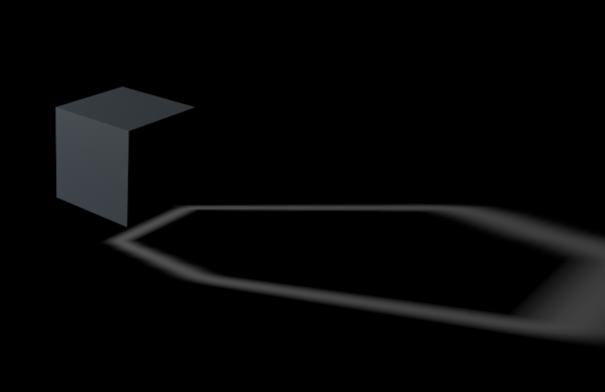
Hey, this is what I get... its like the borders of the shadow are showing the plane
me@grafxflow
02 Jan 2016
Hi Mauro,
What version of C4D are you using?
Plus do you have a screen shot of your render settings?
Nick D
04 Mar 2016
I often need to render out simple animations as PNGs with transparent backgrounds so that I can create sprite sheets out of them. So far this plug-in is the ONLY thing that works for me, so thanks so much for making it available! The other methods of shadow catching from C4D always seem to require compositing OVER something else using multiply afterwards, but I need to deliver images with transparency included in them.
Unfortunately the render times are killing me -- it takes hours to render things that normally would take minutes. Do you have any tips for speeding up rendering with this plug-in? I'm thinking maybe if I do two passes - one for the object and one for the shadow, both with transparent backgrounds - I might be able to tweak the settings for the shadow pass to disable anything that's not needed. I will try a few things, but I'm wondering if you have any tips. Thanks again!
Al C
11 Jul 2016
Hey awesome plugin, but my output has the grey transparent background, how to get rid of it
me@grafxflow
11 Jul 2016
Do you have a screenshot? Or can you go in to more detail?
SEBASTIAN NOLTE
19 Oct 2016
OHHHH GOD - THANK YOU - WORKS GREAT AT C4D R17
me@grafxflow
19 Oct 2016
Perfect thanks for the update Sebastian
Jacob
22 Oct 2016
Thanks for an amazing plugin!
I'm having a bit of trouble. I have an infinite light which cast a Raytraced hard shadow. When I render it out the shadow is solid black, but I need it to be reddish color. Is it possible to adjust the shadow color or maybe add multiply or transparency to it? I'm using sketch and toon as well btw.
mahdi mehrabi
19 Jun 2017
Hi
I'm Gonna Use Live link In After Effects all the Harrow directly and no need to tiff render
I entered the After Effects environment.
But the material plane is seen and do not provide shade for Alpha
Please guide me
Thank you
me@grafxflow
19 Jun 2017
Hi Mahdi,
I am unsure if shadow catcher will allow this? due to it being processed within its own c4d render rather than after effects.
Maybe using c4d's built in compositing would be a better option.
Eriol
13 Aug 2017
you saved my day!!
Srinath
16 Aug 2017
Hi Sir nice Tutorial, I want to Shadow Fallows Through animated character..
Miles
31 Aug 2018
Hello I curious to know if this plug in works for cinema 4d lite?
me@grafxflow
31 Aug 2018
Unfortunately I have never used c4d light so can't give you a yes or no answer.
Yogesh verma
06 Dec 2018
Hi me@grafxflow,
read your all comments and appreciate that you are constantly in with ur viewers. i installed the shadow catcher and its working fine but i need this plugin to work like R18 and if it's not then kindly guide some other plugin for alpha reflection.
Cobus
15 Dec 2018
Thank you so much! I am really peeved with Maxon for including its its shadow catching material ONLY in its Studio version. This should have been a basic feature in versions ages ago!
Ahsen Tariq
15 Jan 2019
Is it possible with Octane or Redshift
Dawid
30 May 2019
Doesn't work with C4D R20 Prime. Not visible in Alpha -> Texture in material editor :(
me@grafxflow
30 May 2019
Sad to hear that Dawid... probably better to see if it can be achieved with compositing.
Currently it's only be tested with Cinema 4D R9 through to R17. :(
Robbie
18 Jul 2019
Thank you so much! You are my hero.
I don't know if this is already stated, but for me, the transparency of the shadow was always 100%. Even when I played around with the transparency in the material. (Step 9).
I found a way to control the shadow opacity by adding a Display Tag onto the floor and use the visibility and dropped it to 75%.
Adam
21 Feb 2020
Thanks so much for this. I am amazed that 3D software makes it so hard to capture just shadows. Seems so logical. Thanks for making this.
Is there a way to lighten the shadow though so it's not pure dark?
Thanks!
Adam
me@grafxflow
21 Feb 2020
Hi Adam,
Sadly I wasn't the person who originally developed this plugin, but I am guessing you could play around with the colour or opacity?
Here is a updated tutorial which might help tutorial link.
Also one thing to note - as from C4D R18 onwards shadow catcher is an actual built in feature.... finally! A nice part of this new options is that it also allows reflections as well.