

Written by me@grafxflow
07 Apr, 2020
0
7,573
I've had a few people ask me - Is there anyway to seperate the 3D object and the shadow? So here is a short tutorial on how I would do it.
So several... several years ago... 2008 to be exact, I posted this tutorial Shadow Catcher plugin in Cinema 4d in which I showed how to install the plugin and setup a basic scene, but now we want to do a more advanced compositing to separate the object from the shadow.
Part 1 - install the plugin and create a basic 3D scene... view it here.
Part 2 - use Advanced Compositing to separate the object and shadow alphas (This page).
So the problem that the previous tutorial created, was that if we wanted to then do some colour correction in Photoshop or After Effects we would have one layer which contained both the object and the shadow - therefore we would be colour correcting both of them at the same time. What we want to do is have a seperate alpha for the object and a seperate alpha for the shadow.
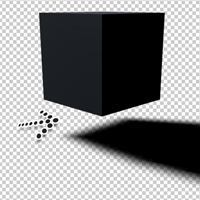
Here is what we are trying to achieve....

So first in C4D go to the Render -> Edit Render Settings....

And highlight the Multi-Pass checkbox.

In the Save tab add 2 filenames - Regular Image and the Multi-Pass Image. Make sure the Multi-Pass format is Tiff (PSD Layers) and Depth 16 Bit/Channel and uncheck the Multi-Layer File option.

NOTE: The Multi-Pass Image is going to be the Object Buffer - This is black and white version of the frame, with the selected object in white.
Now we want to tell C4D which object to give a seperate alpha, so now select just the object, and then go to Tags -> Cinema 4D Tags -> Compositing which will add the tag.

Now there should be an Object Buffer tab and simply enable Buffer 1.

Now go back to the render settings and then choose the Multi-Pass option, here choose the dropdown 'Multi-Pass...' next to 'Effect...' and select Object Buffer, this should automatically set the Group ID number as 1 which was the number given when using the Object Buffer Tab.

Now render this out with the 'Render to Picture Viewer' and choose the Layer tab. You should now see 2 separate alphas. One with the 'Object and the Shadow' and one with just the 'Object' which is the buffer.

Now what you would want to do is simply place these new element/layers inside an After Effects composition and choose the 'Toggle Switches / Modes'. Then on the layers which need to be masked select the following.

Here is how it should be viewable with the different layers active.
Hope this helps.
17 Mar, 2008

12 Jan, 2010

08 Jan, 2007

I am a Full-stack Developer who also started delving into the world of UX/UI Design a few years back. I blog and tweet to hopefully share a little bit of knowledge that can help others around the web. Thanks for stopping by!
Follow
20 May, 2025

11 Jul, 2023

Views: 169,328

Views: 41,898

Views: 39,691

Views: 36,502


